


Here in my part of the UK, Autumn has well and truly arrived! Various personal reasons (including my two sons’ birthdays along with my own wedding anniversary) - make this time of year very special and therefore Autumn my absolute favourite season. I just can’t get enough of those rich, beautiful orange, gold and red tones as the leaves turn and the air smells different... although maybe all that leaf sweeping in the garden, not so much!
With the current season in mind, I have made this Autumnal mixed media card featuring free-hand leaves created out of something equally as exciting… Brand new Nuvo Chalk Mousse colours! The four new colours launched include ‘Delicate Blue’ and ‘Thunderstorm’ as well as the two I have used here today which are ‘Lemon Curd’ and ‘Bourbon Biscuit’.
I hope you’ll join me to find out just how much fun it can be to have a play around with these beautifully creamy mousses with just a palette knife.

To make today's card, you will need the following:
- Nuvo Chalk Mousse - Lemon Curd & Bourbon Biscuit
- Craft Perfect 7x7” card blank - Ivory White
- Craft Perfect ‘Autumn Maple’ 6x6” Pearlescent card stack
- Craft Perfect - Black Velvet Satin Effect Mirror Card
- Nuvo Sparkle Spray - Japanese Maple
- Cross-hatch die from the Tonic ‘Patterns & Prints’ Stamp Club Die Set
- Black acrylic paint
- Nuvo Crystal Drops - Mustard Gold
- Nuvo Pure Sheen Sequins - Autumn Blaze
- Nuvo Pure Sheen Sequins - Autumn Blaze
- ‘The Four Seasons - Amber Autumn’ die set
- Thick cardstock for creating a stencil/mask
- Small pointy ended metal palette knife
- Organza ribbon (deep red)
- Nuvo Deluxe Adhesive
- Craft Perfect 6mm double-sided tissue tape
- Adhesive foam pads
- Small scissors
- Repositionable spray adhesive
Step 1

Die cut x3 cross-hatch pieces out of thick cardstock (I have used Kraft card). On a 6x6” piece of ‘Cosmic Copper’ cardstock, stick down the die cut shapes in a random arrangement using repositionable spray adhesive. I trimmed down the excess of one piece to use it in a different area.
Step 2
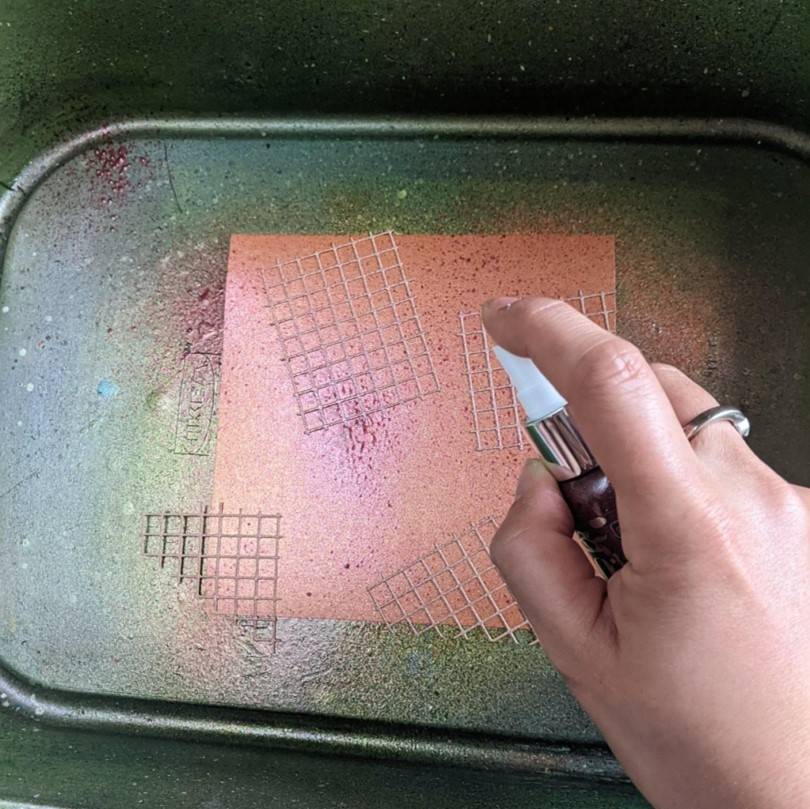
Spray a few short, sharp, bursts of sparkle spray in different directions across the page.
Step 3

Once the spray is dry, remove the stuck down shapes and then randomly splatter with watered down black acrylic paint.
Step 4
Step 5

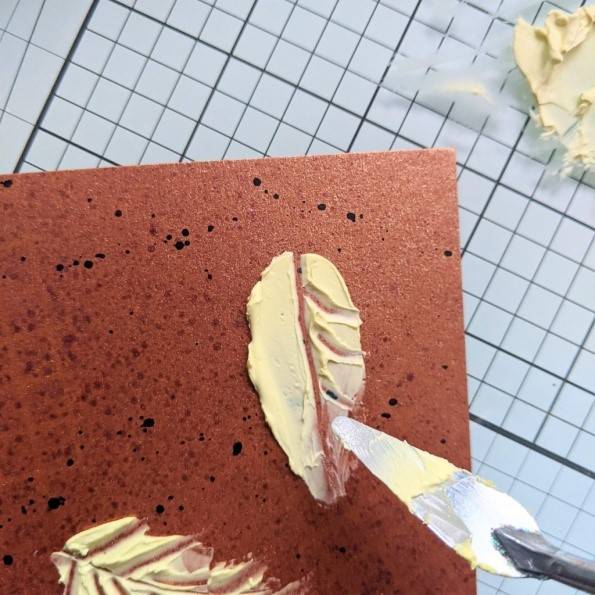
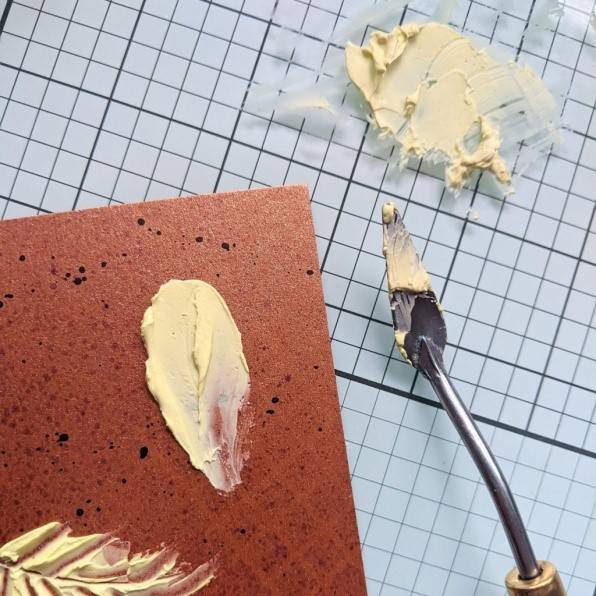
Using a small palette knife with a pointy end, with the bottom flat side smear chalk mousse onto your page to resemble leaf shapes and then add ‘vein’ lines in the wet mousse to give the leaves their detail and texture.
Step 4
Step 5

Repeat this all over your page in both colours to create a random pattern. Set aside to allow the mousses to harden.
Using a small palette knife with a pointy end, with the bottom flat side smear chalk mousse onto your page to resemble leaf shapes and then add ‘vein’ lines in the wet mousse to give the leaves their detail and texture.
Repeat this all over your page in both colours to create a random pattern. Set aside to allow the mousses to harden.
Step 4

Using a small palette knife with a pointy end, with the bottom flat side smear chalk mousse onto your page to resemble leaf shapes and then add ‘vein’ lines in the wet mousse to give the leaves their detail and texture.
Step 5

Using a small palette knife with a pointy end, with the bottom flat side smear chalk mousse onto your page to resemble leaf shapes and then add ‘vein’ lines in the wet mousse to give the leaves their detail and texture.
Step 6
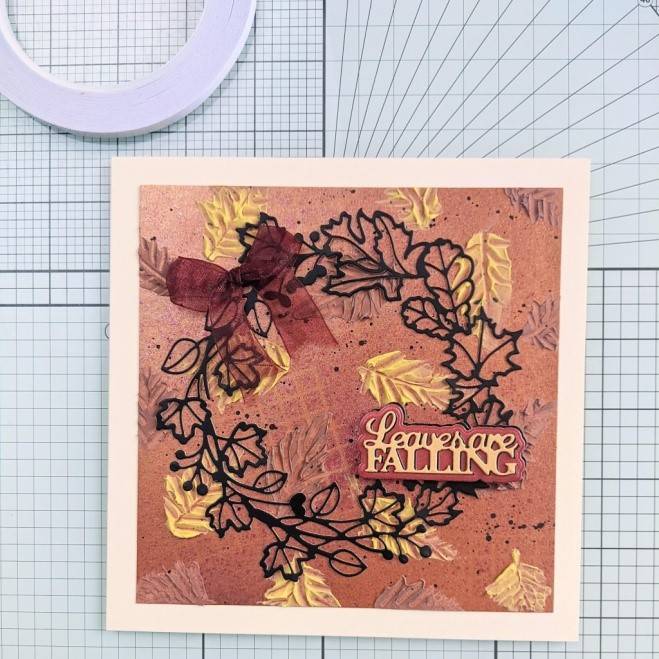
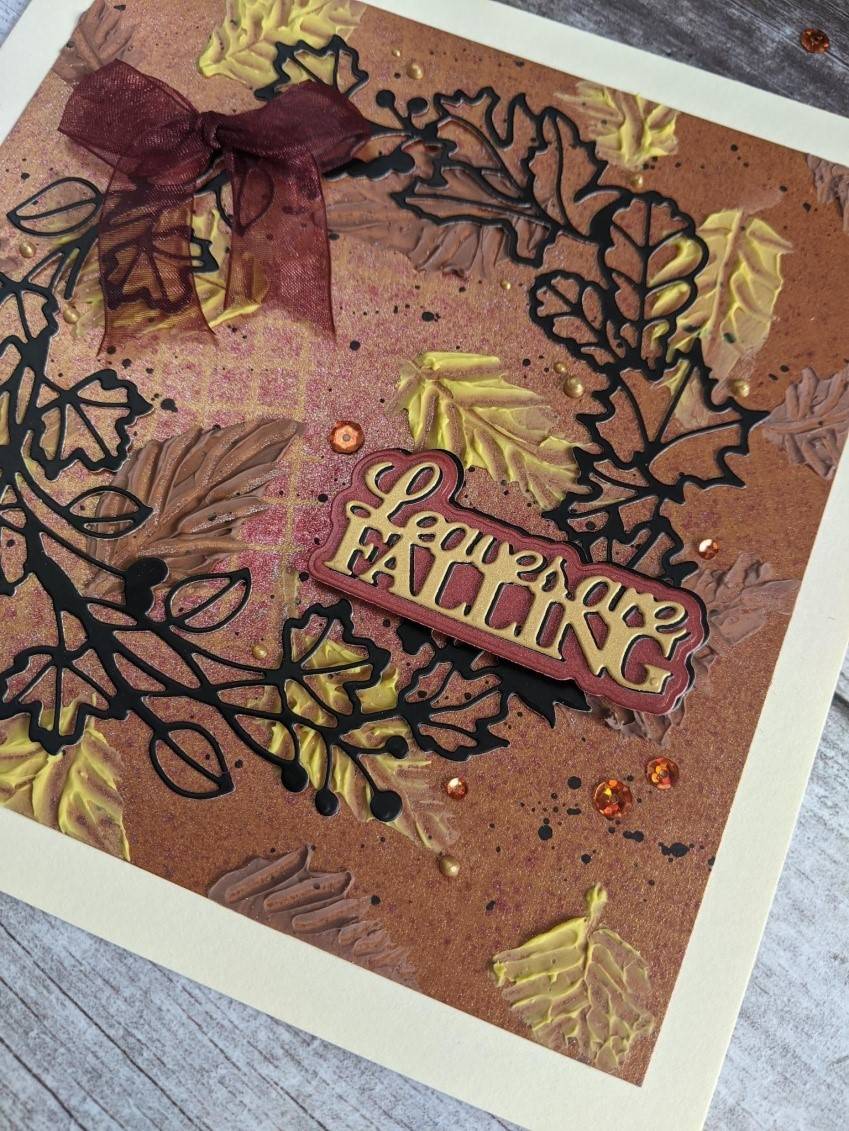
Using the ‘Four Seasons Amber Autumn’ die set, cut out the intricate part of the wreath die in Black Velvet mirror card, as well as the sentiment and sentiment background panel, In the ‘Red Velvet’ pearlescent cardstock, cut out a second sentiment background panel and a second ‘falling leaves’ sentiment out of ‘Lemon Lustre’ pearlescent card.

Step 7

Glue the coloured die cut pieces on top of the black ones, slightly off-set to create a ‘drop shadow effect’. Adhere the sentiment to the background panel.
Step 8

Glue the wreath to the panel and then using foam adhesive pads, attach the sentiment positioned as shown.
Step 9

Attach the panel to the centre of your 7x7” card base.
Step 9
Step 10
Step 9
Step 9

Attach the panel to the centre of your 7x7” card base.
Step 10
Glue the wreath to the panel and then using foam adhesive pads, attach the sentiment positioned as shown.
Tie a bow with the organza ribbon and cut the ribbon ends. Using a small amount of double-sided tissue tape on the back of the bow loops, attach to the wreath as shown.
Attach the panel to the centre of your 7x7” card base.
Glue the wreath to the panel and then using foam adhesive pads, attach the sentiment positioned as shown.
Step 11

Attach a few sequins around the sentiment and apply a few random crystal drops of varying sizes, mixed in with the leaves around the edges of the wreath.

Attach a few sequins around the sentiment and apply a few random crystal drops of varying sizes, mixed in with the leaves around the edges of the wreath.
Your seasonal wreath on a unique mixed media background is complete!
Your seasonal wreath on a unique mixed media background is complete!
I hope you’ll give having a play around with these new chalk mousses a go. The matte effect really is ever so different to the drying finishes of all of Tonic’s other various Nuvo mousses and they are so very creamy and smooth to apply. Plus the new colours are gorgeous!
Happy crafting everyone.
Kate x
Buy The Craft Project
