

Hello lovely people, my name is Sasha and I am so honoured to be bringing you this post. We are going to make this super fun side stepper card with a slider element. I call it The Triple S. Don’t worry it’s not as complicated as it sounds or looks. If I can do it, so can you super talented crafters!!
What you will need

What you will need
- Stamp club 8 “Whaley great set”
- Stamp Club “Banners and strips set”
- Stamping platform
- Die cutting machine
- Tonic studio scoreboard
- Scissors/ trimmer
- Blending Brush
- Foam tape & liquid adhesive
- Nuvo pitch black ( 508) alcohol marker
- Nuvo hybrid ink cube in Lime Burst, Spring Heather & Laguna Bay
- Nuvo Aqua shimmer in glitter gloss
- White gel pen
- Nuvo Crystal glaze
- Acetate
- Pearlescent card in Caribbean Sea, Blue Frost, Gleaming Lilac ( or any colour you prefer)
- Glitter card in Turquoise Lake, Tropical tide, Opulent Orchid (or any colour you have)
- Black cardstock
Step 1
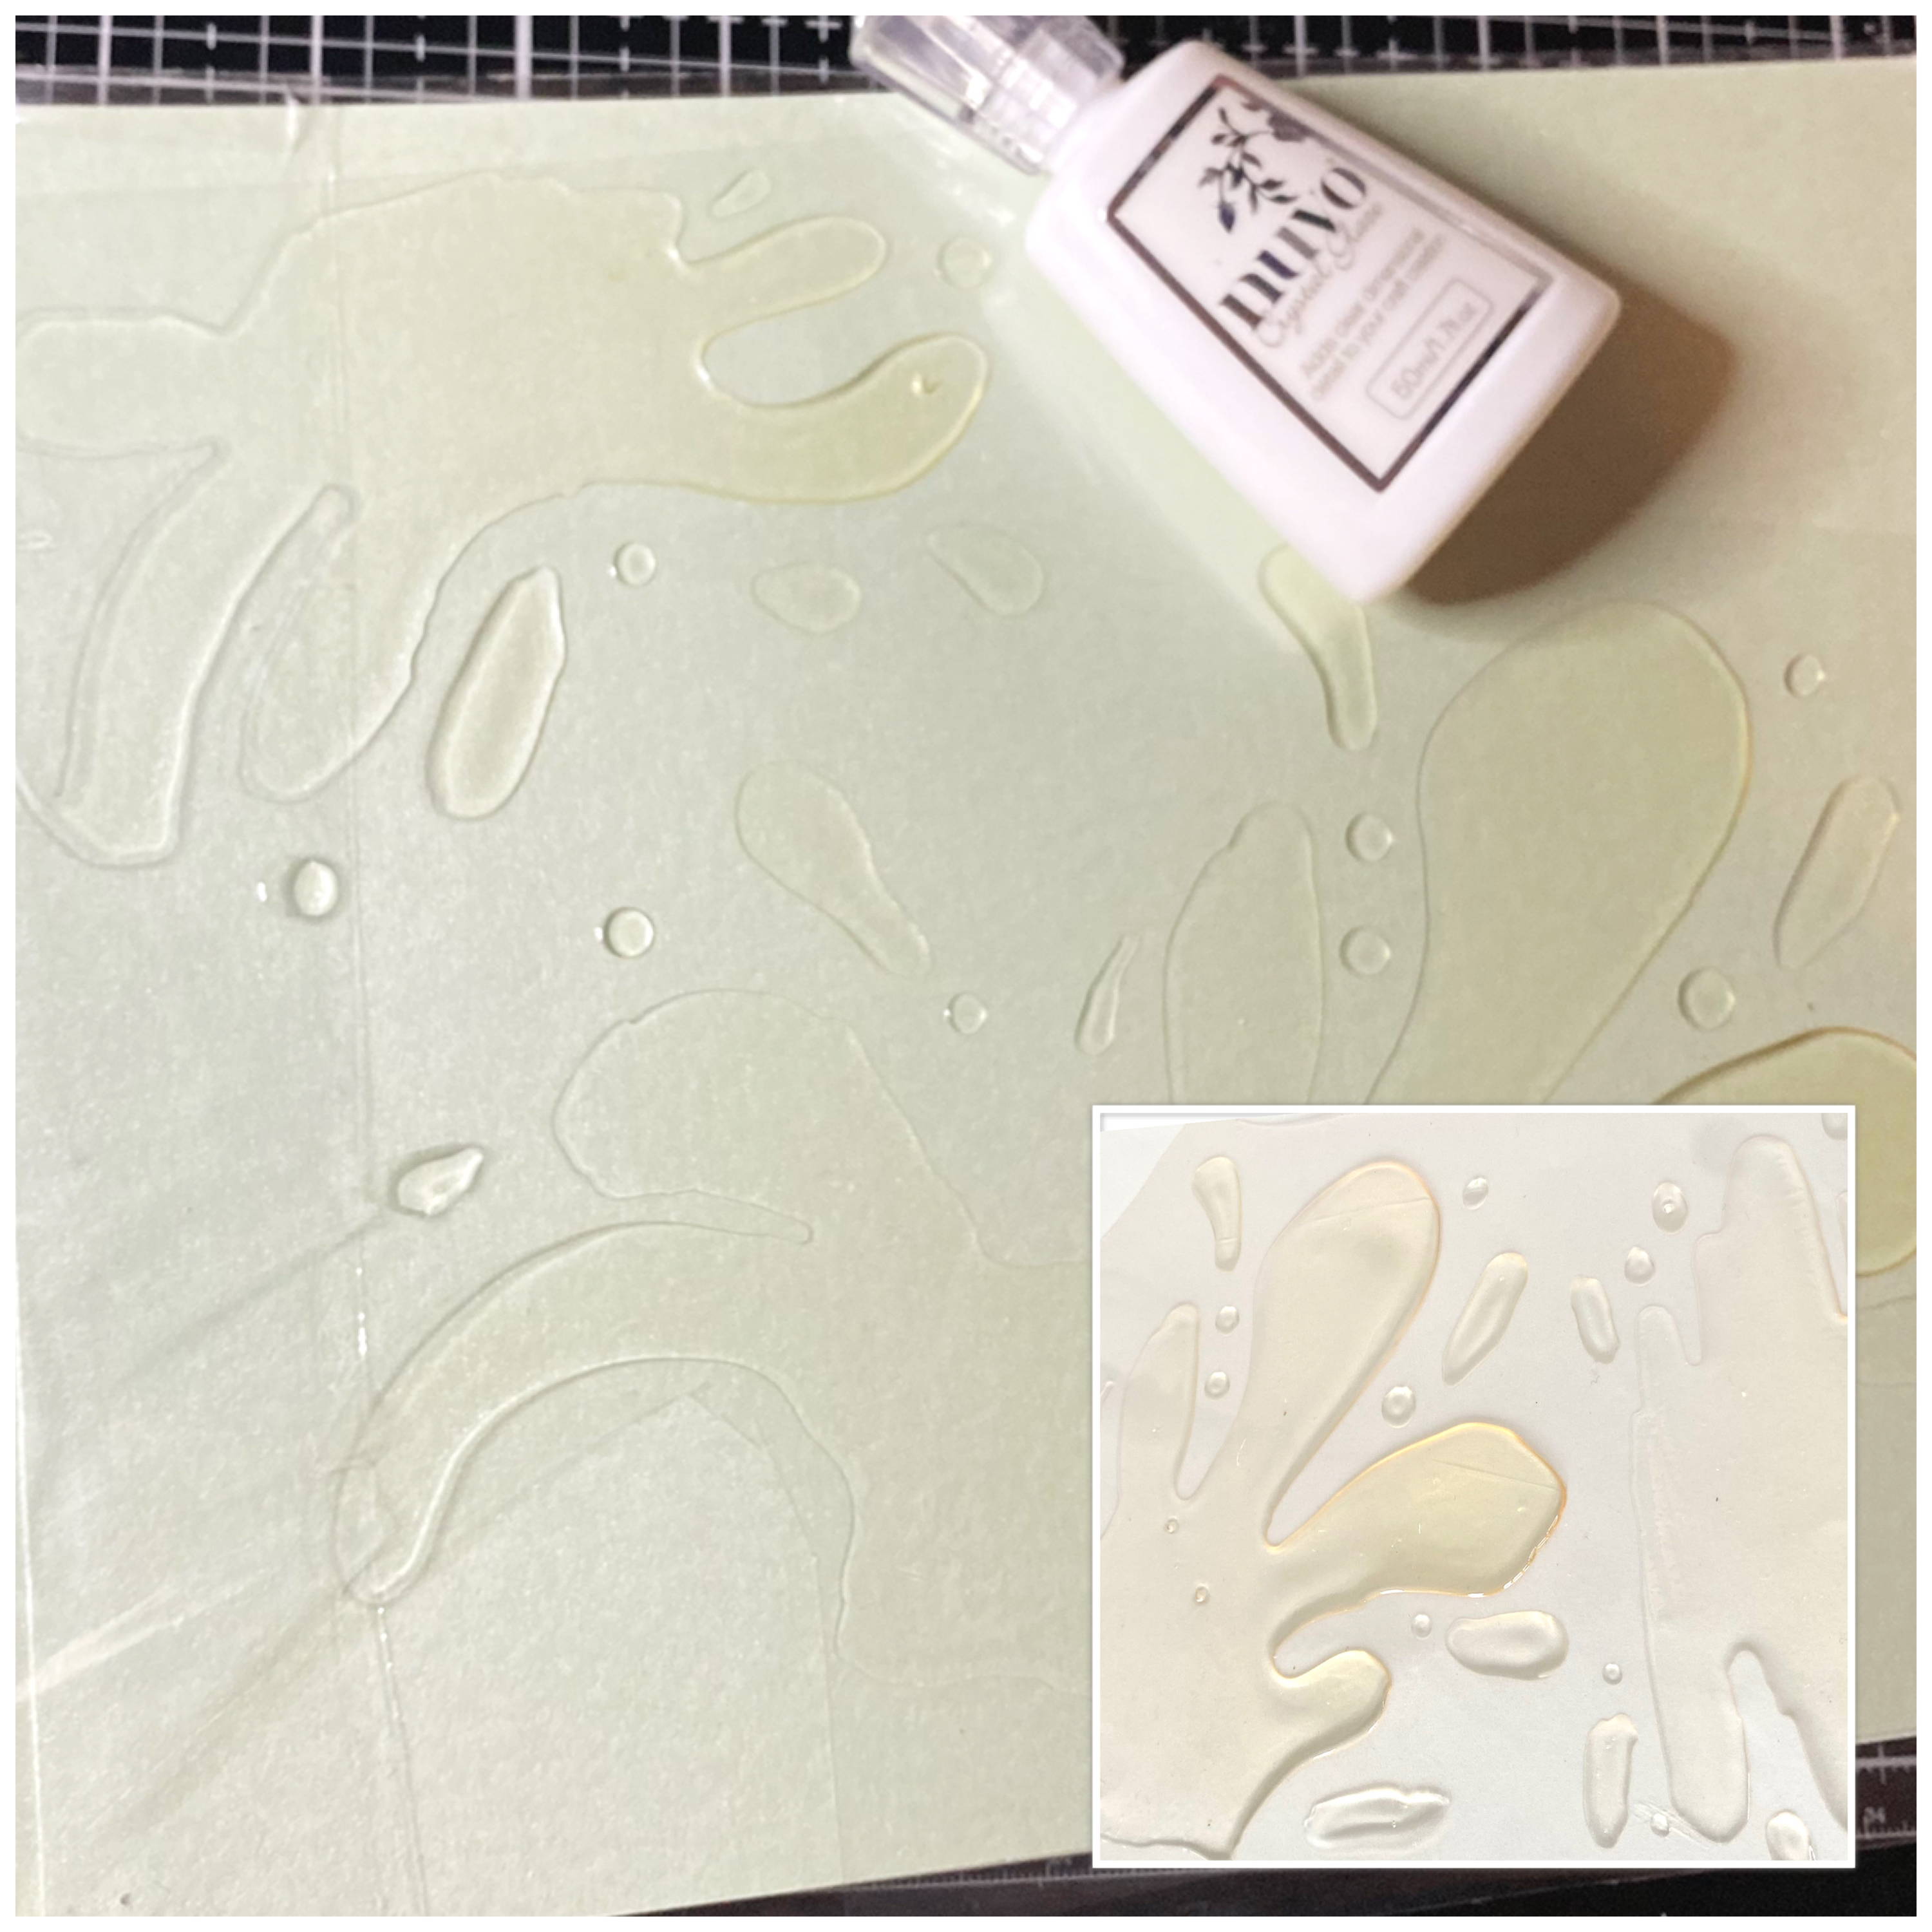
Start by making a splash shape on acetate using the crystal glaze. Be liberal and don't worry about air bubbles, it adds to the look of water. Perfection is not the goal, fun is! So don't aim to be the next Picasso! It's just a splash. Leave that on the side because it needs a while to dry. You can skip this step and just cut out splash shapes out of the acetate but it's really not the same thing
Step 2
Make a template for the stepper card using copy paper which you will later repeat with the card once you are sure. Skip making a template if you are confident or you have seen better instructions elsewhere!
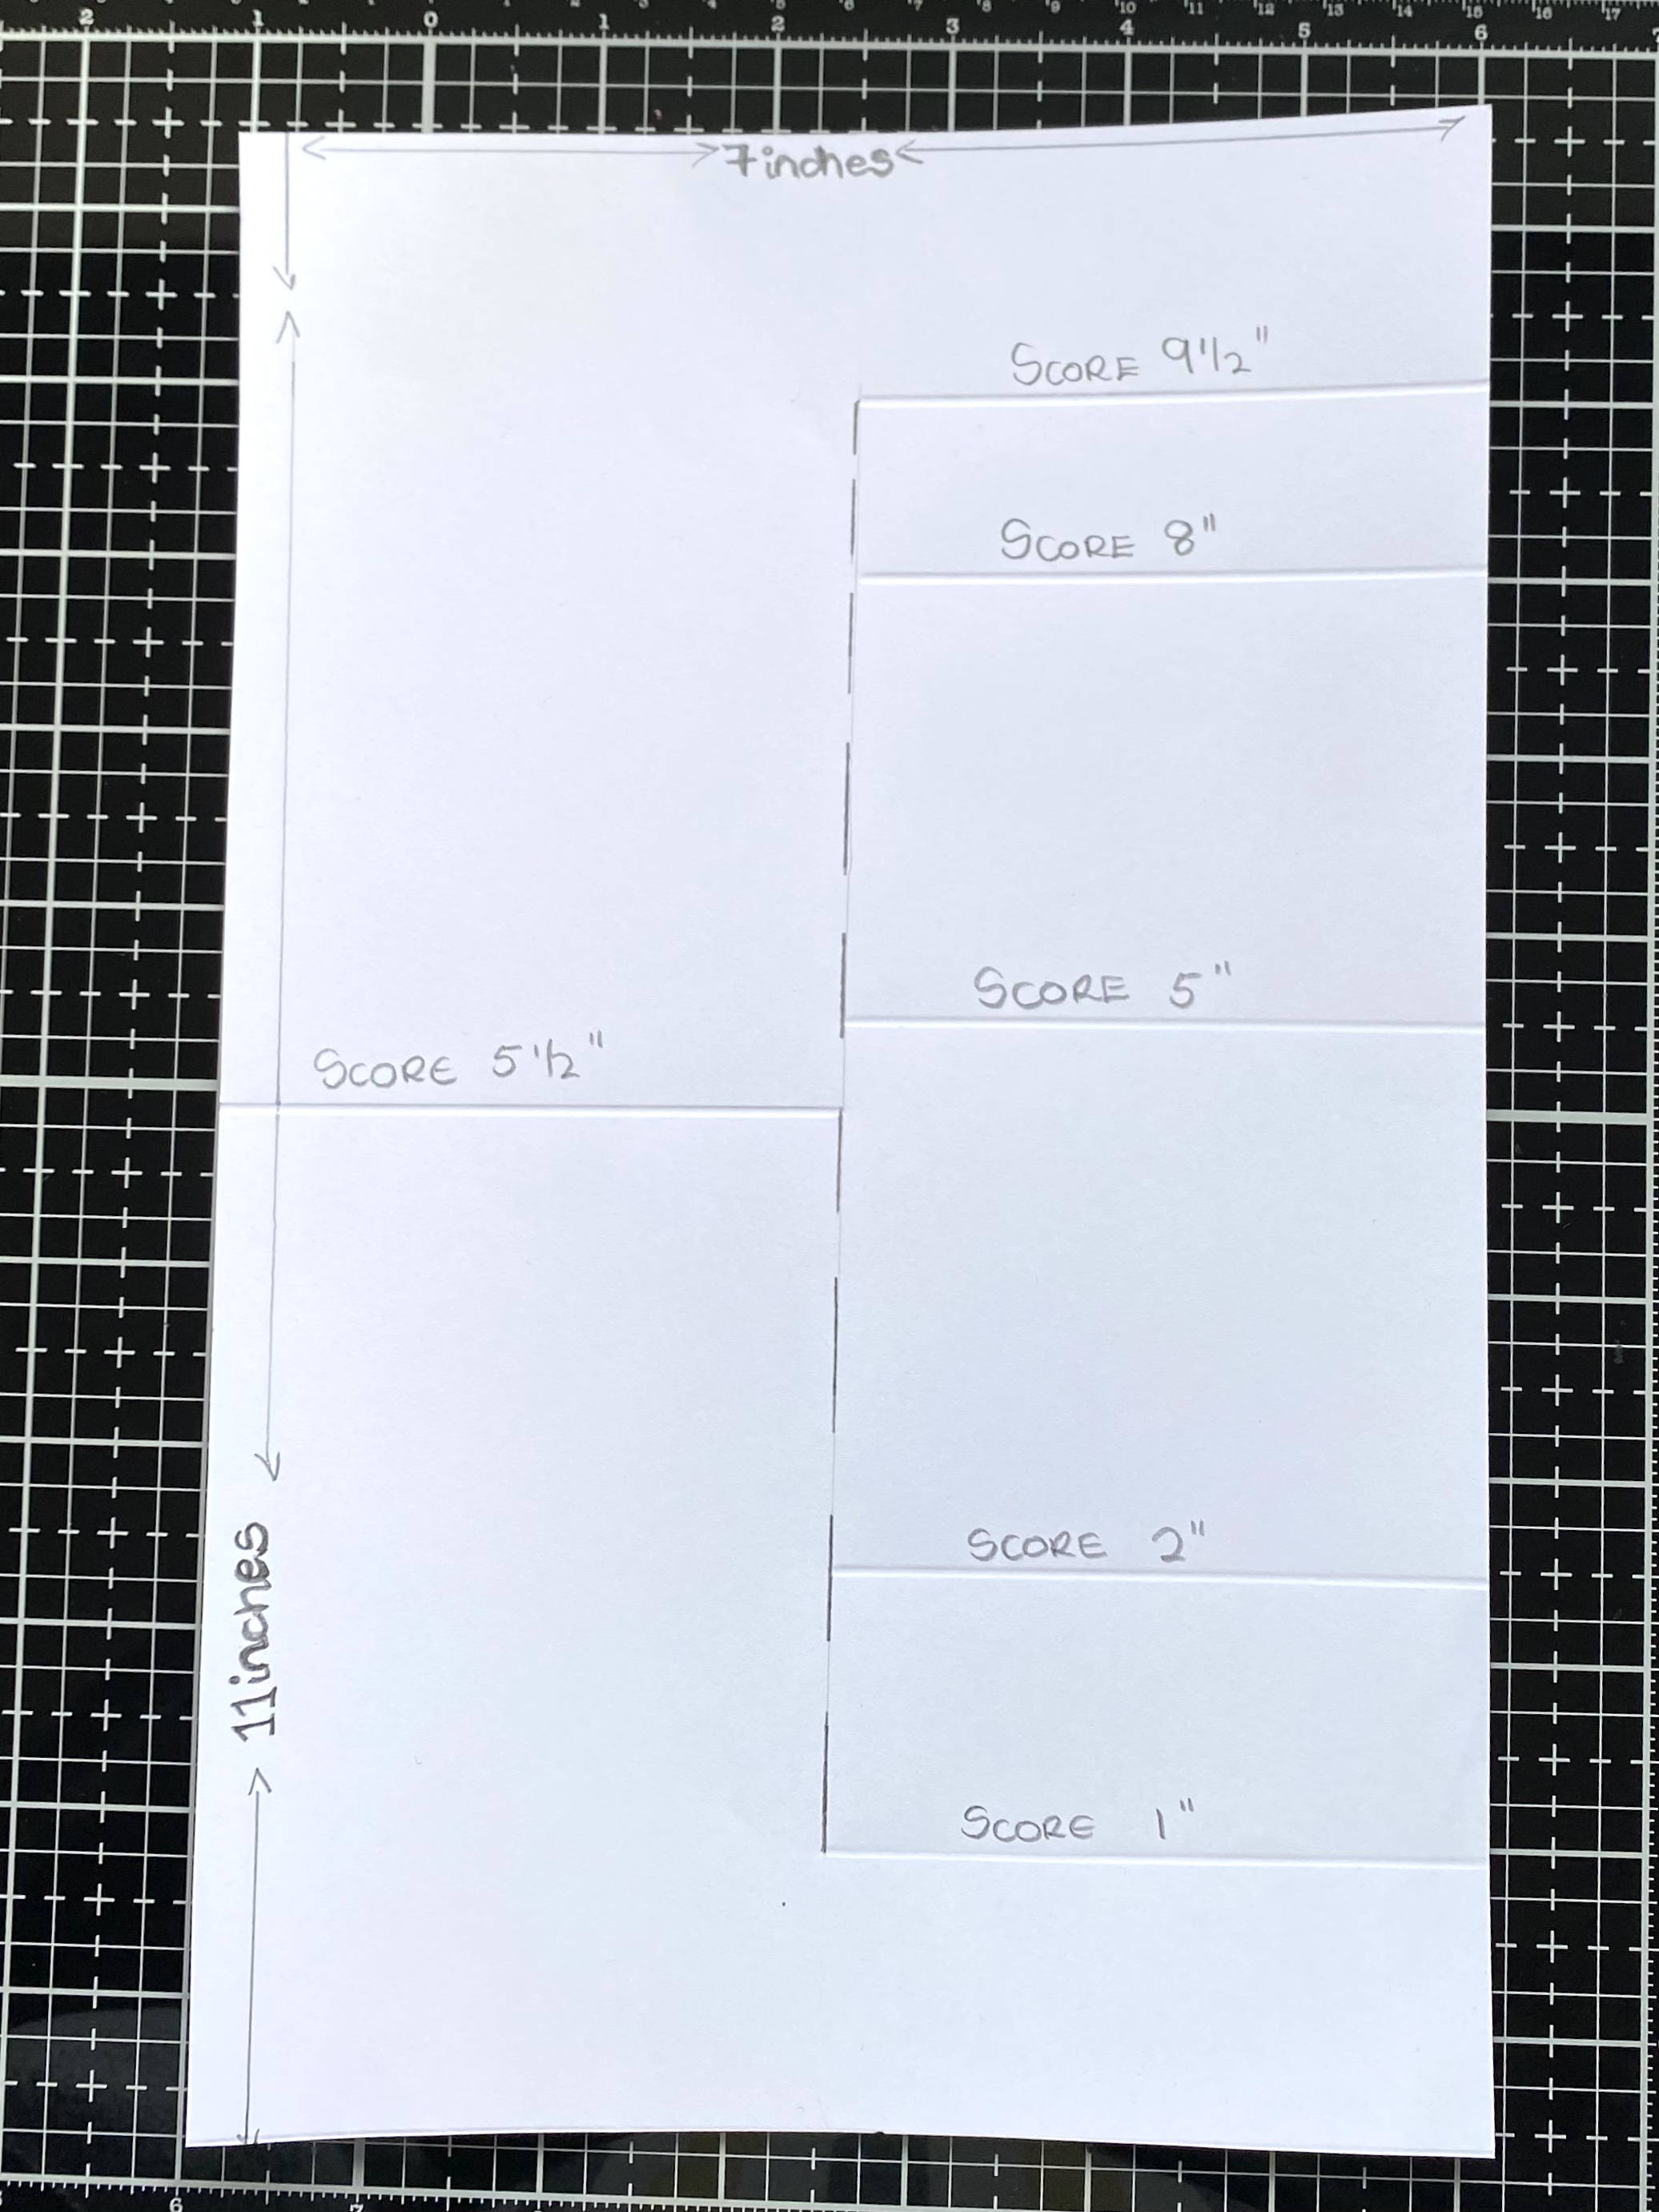
You will need a 7 x 11” paper and your scoreboard.
Draw a light vertical line from the top of the page to the bottom at 3.5”.
Turn the paper sideways and score at 1 , 2 , 5, 8 and 9 ½ inches but only to the pencil line.
Turn the paper to the other side without score marks and score at 5 ½”. Make a dotted line from the top
score mark (9 ½”) to the bottom one (1”), this is where you are going to make a slit with an exacto knife or a scissors or a trimmer.
Make a template for the stepper card using copy paper which you will later repeat with the card once you are sure. Skip making a template if you are confident or you have seen better instructions elsewhere!
You will need a 7 x 11” paper and your scoreboard.
Draw a light vertical line from the top of the page to the bottom at 3.5”.
Turn the paper sideways and score at 1 , 2 , 5, 8 and 9 ½ inches but only to the pencil line.
Turn the paper to the other side without score marks and score at 5 ½”. Make a dotted line from the top
score mark (9 ½”) to the bottom one (1”), this is where you are going to make a slit with an exacto knife or a scissors or a trimmer.
Step 3
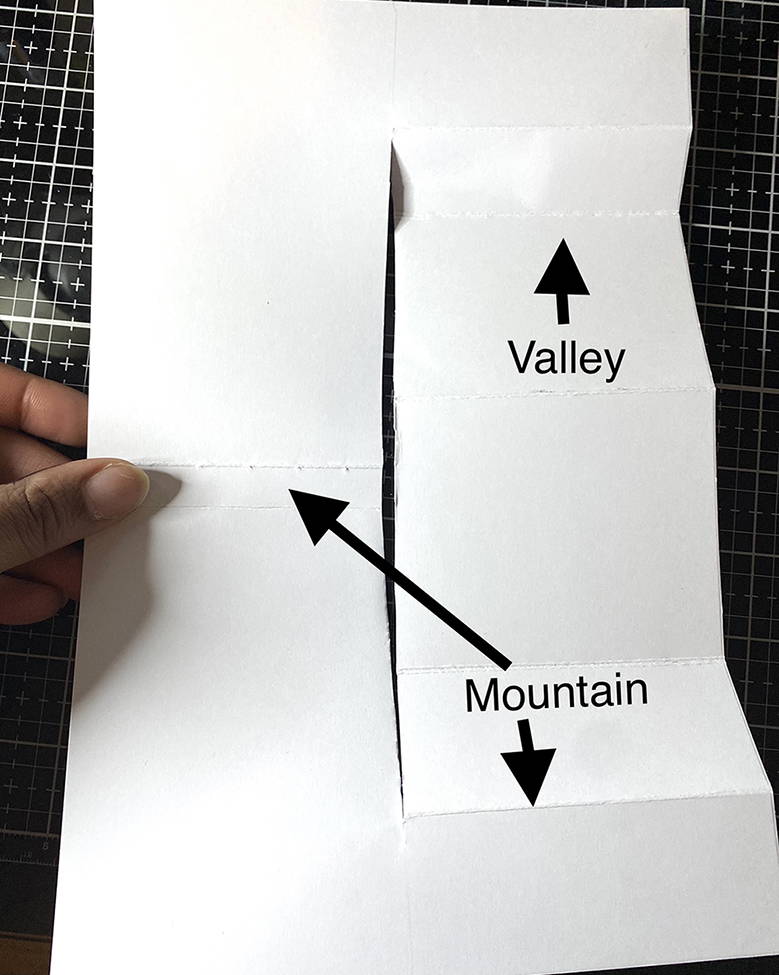
Fold and burnish the 5 ½” line going upwards like a tent card.
Fold the 1, 5 and 9 ½” lines going up just like you did the one before (they are mountains) and fold the 2 and 8” lines downwards (they are valleys) Reference picture if confused.
Step 4
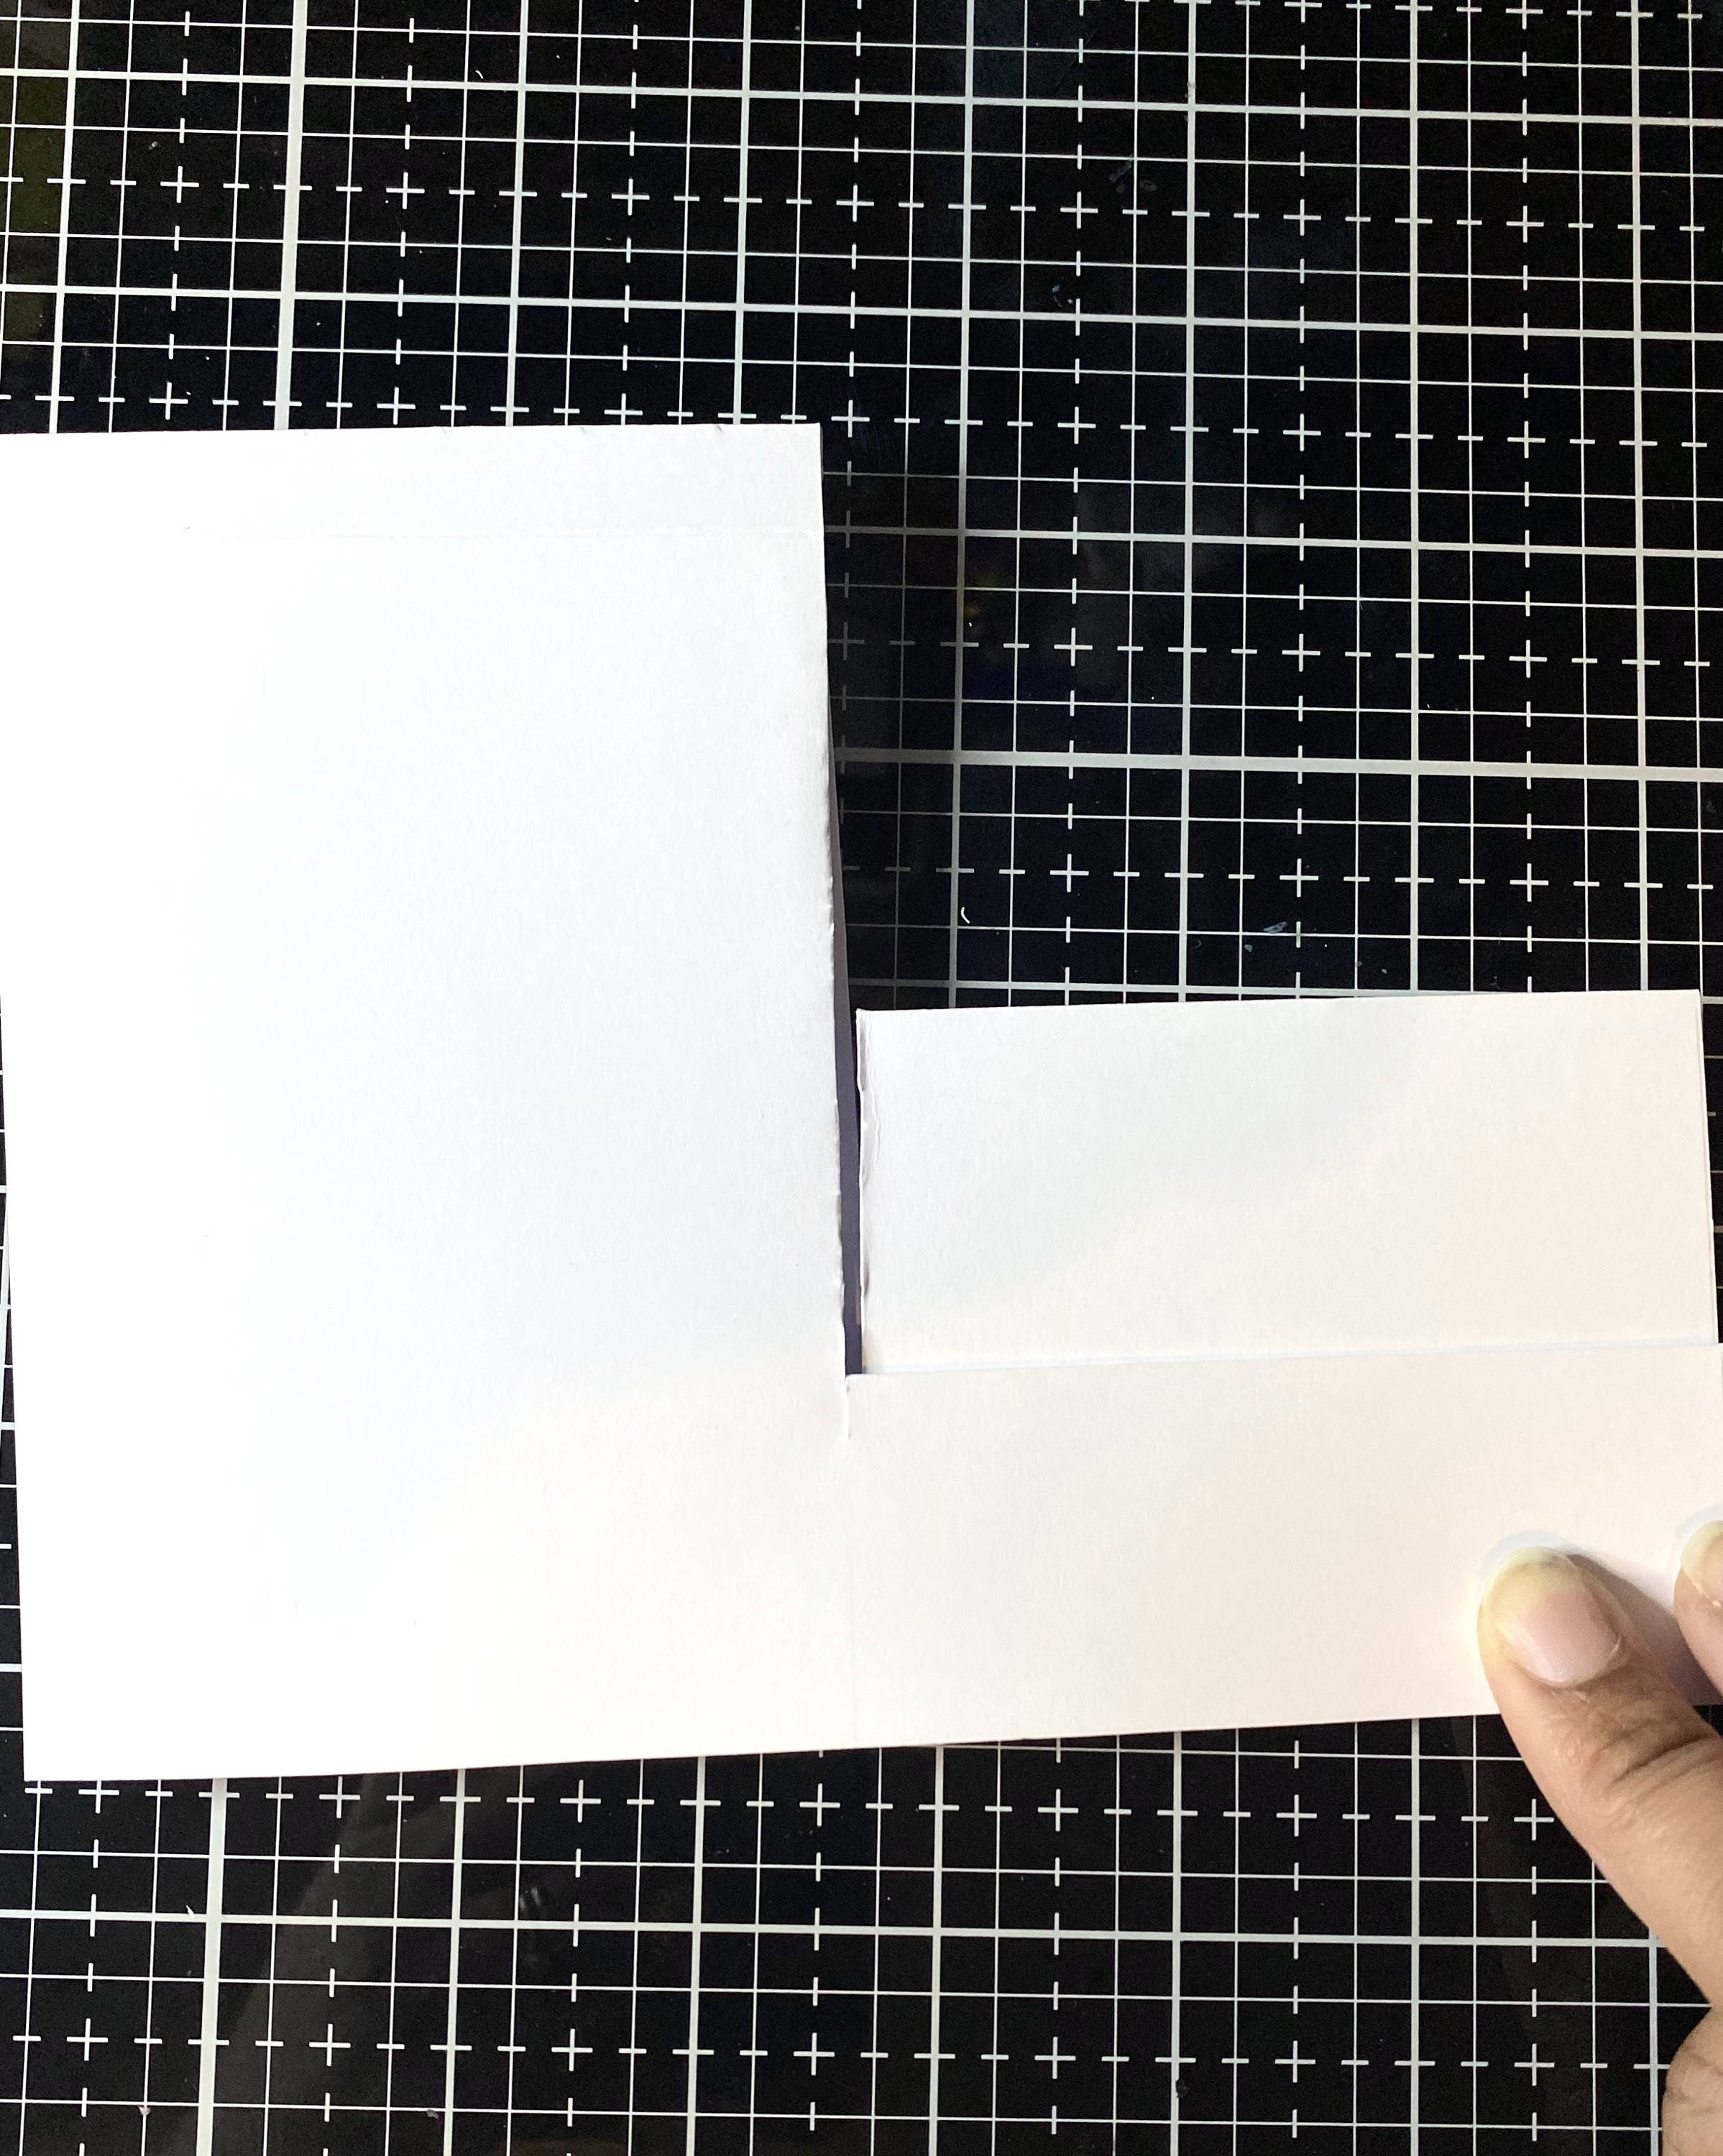
You have practised and made some really good templates. Check you out! So repeat what you just did in step 2 but with a card. And you should have something that looks like this.
Step 5
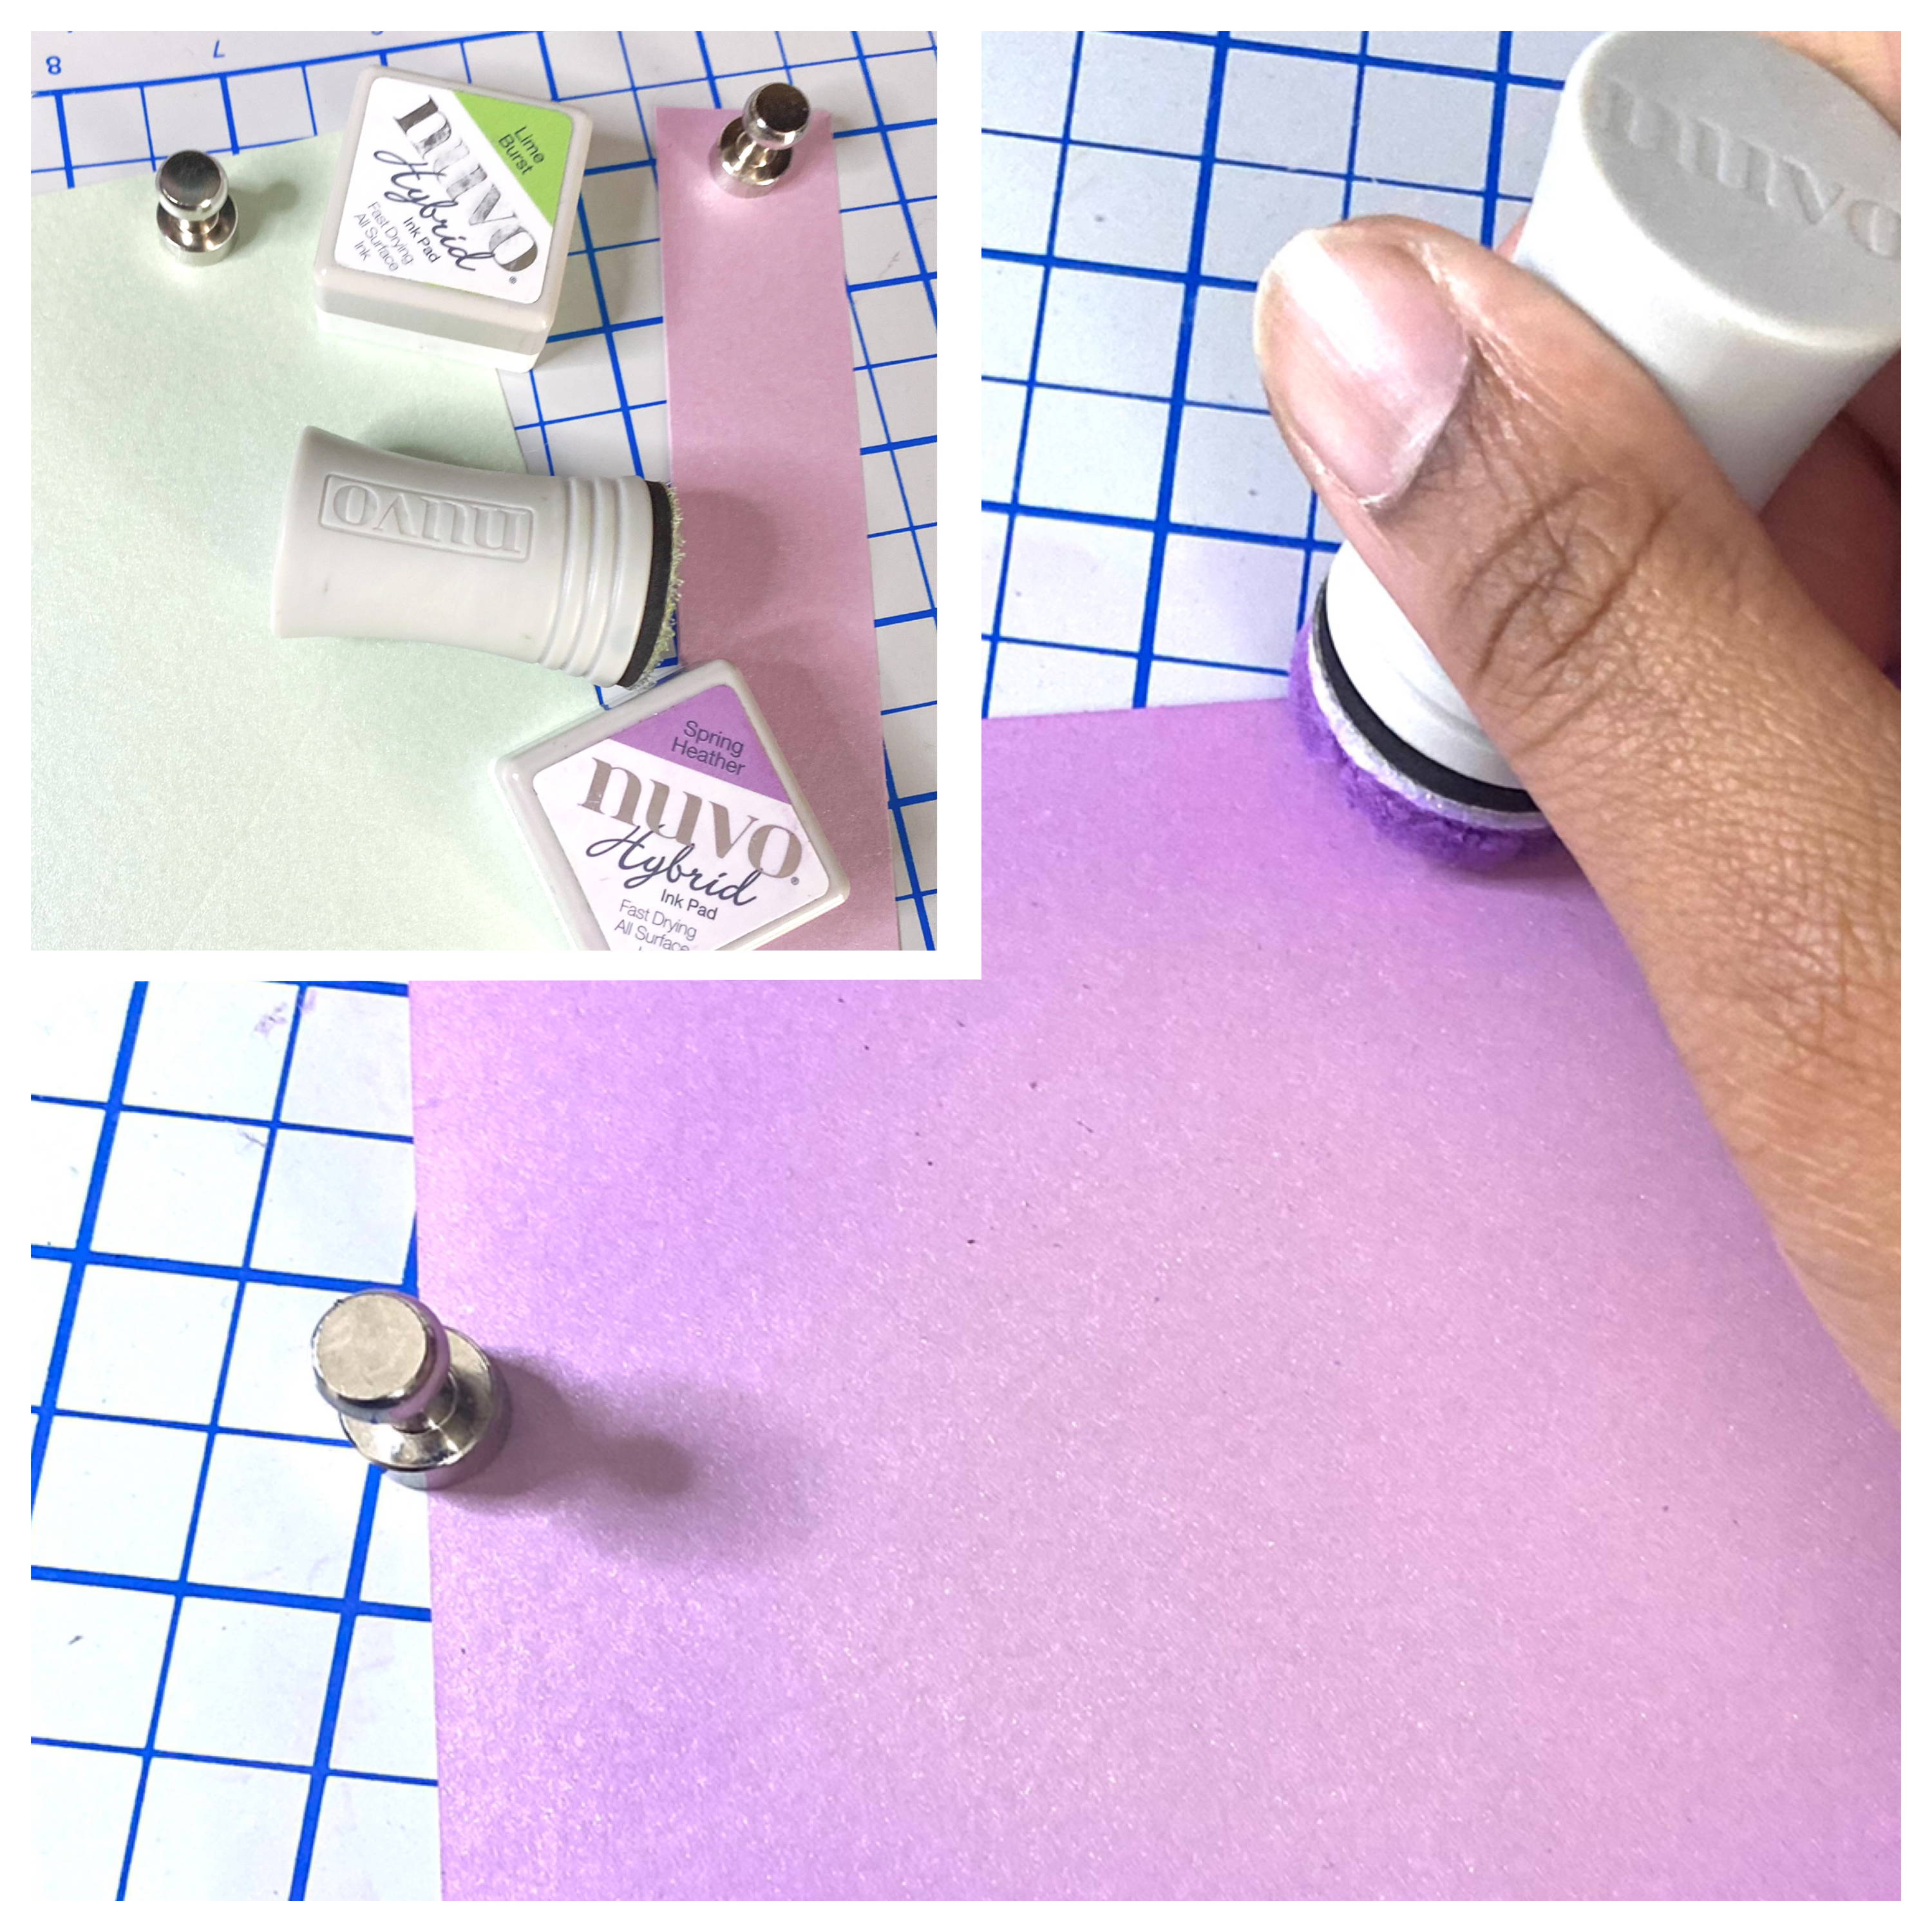
Get your inks, the gleaming lilac and frost blue pearlescent card (if you have scraps use them instead and if not please cut a strip about 4” wide, that's all we need). We are just going to use co-ordinating colours to lightly blend over the edges. Or mix and match if that’s what you want. Let your creative juices flow in any direction, just not too far to the left! If you have the magnetic platform, this is a good time to use it!
Step 6
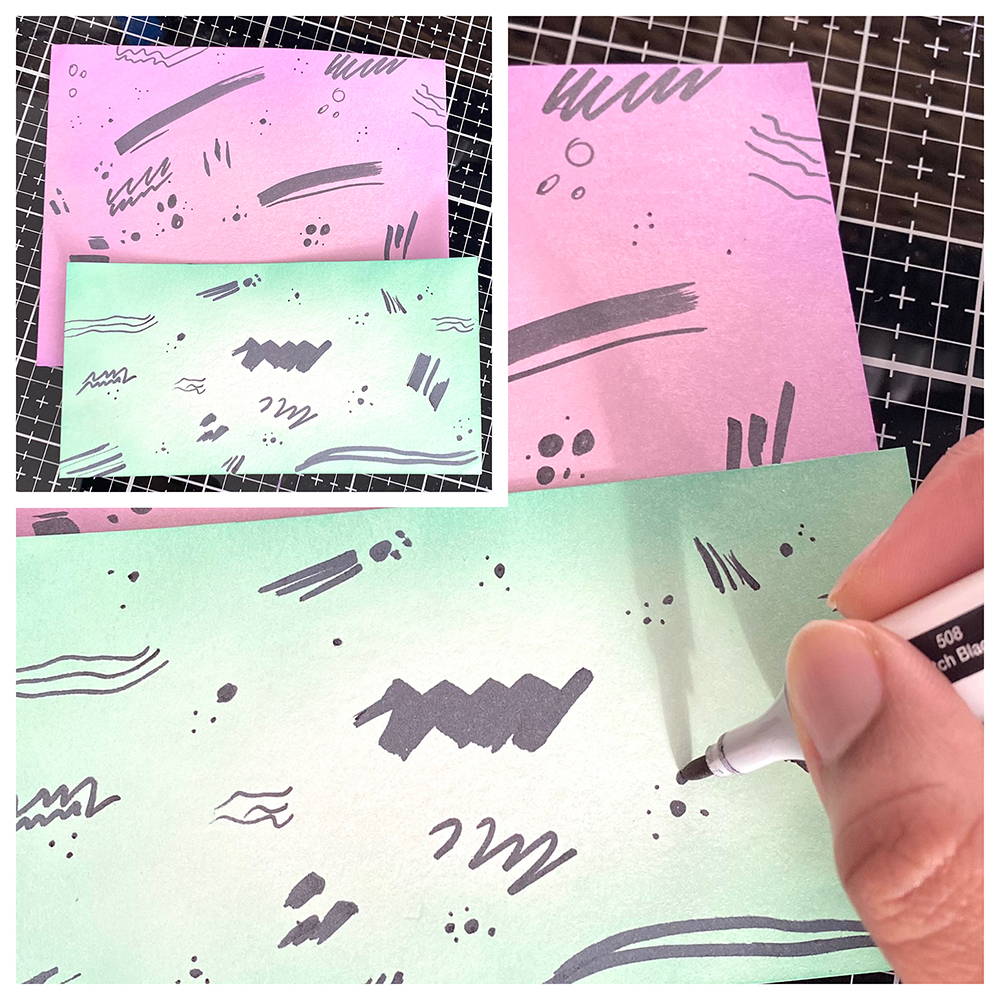
Use your marker to make some funky shapes, don’t overthink it. Literally just make lines and dots. Alternatively you can stamp using the wiggly line and the tinier stamps in the set. It won’t be as quick as using the marker but hey you chose perfectionism over simple life!
Step 7

Using an embossing ink, stamp and heat emboss your whale (s) onto the 3 colours of glitter cardstock, as well as your sentiment on the black
cardstock. Don’t forget to prep your card with antistatic powder please. Also you can emboss with any colour you want. White or maybe even gold?! Whatever whale please you!
Step 8
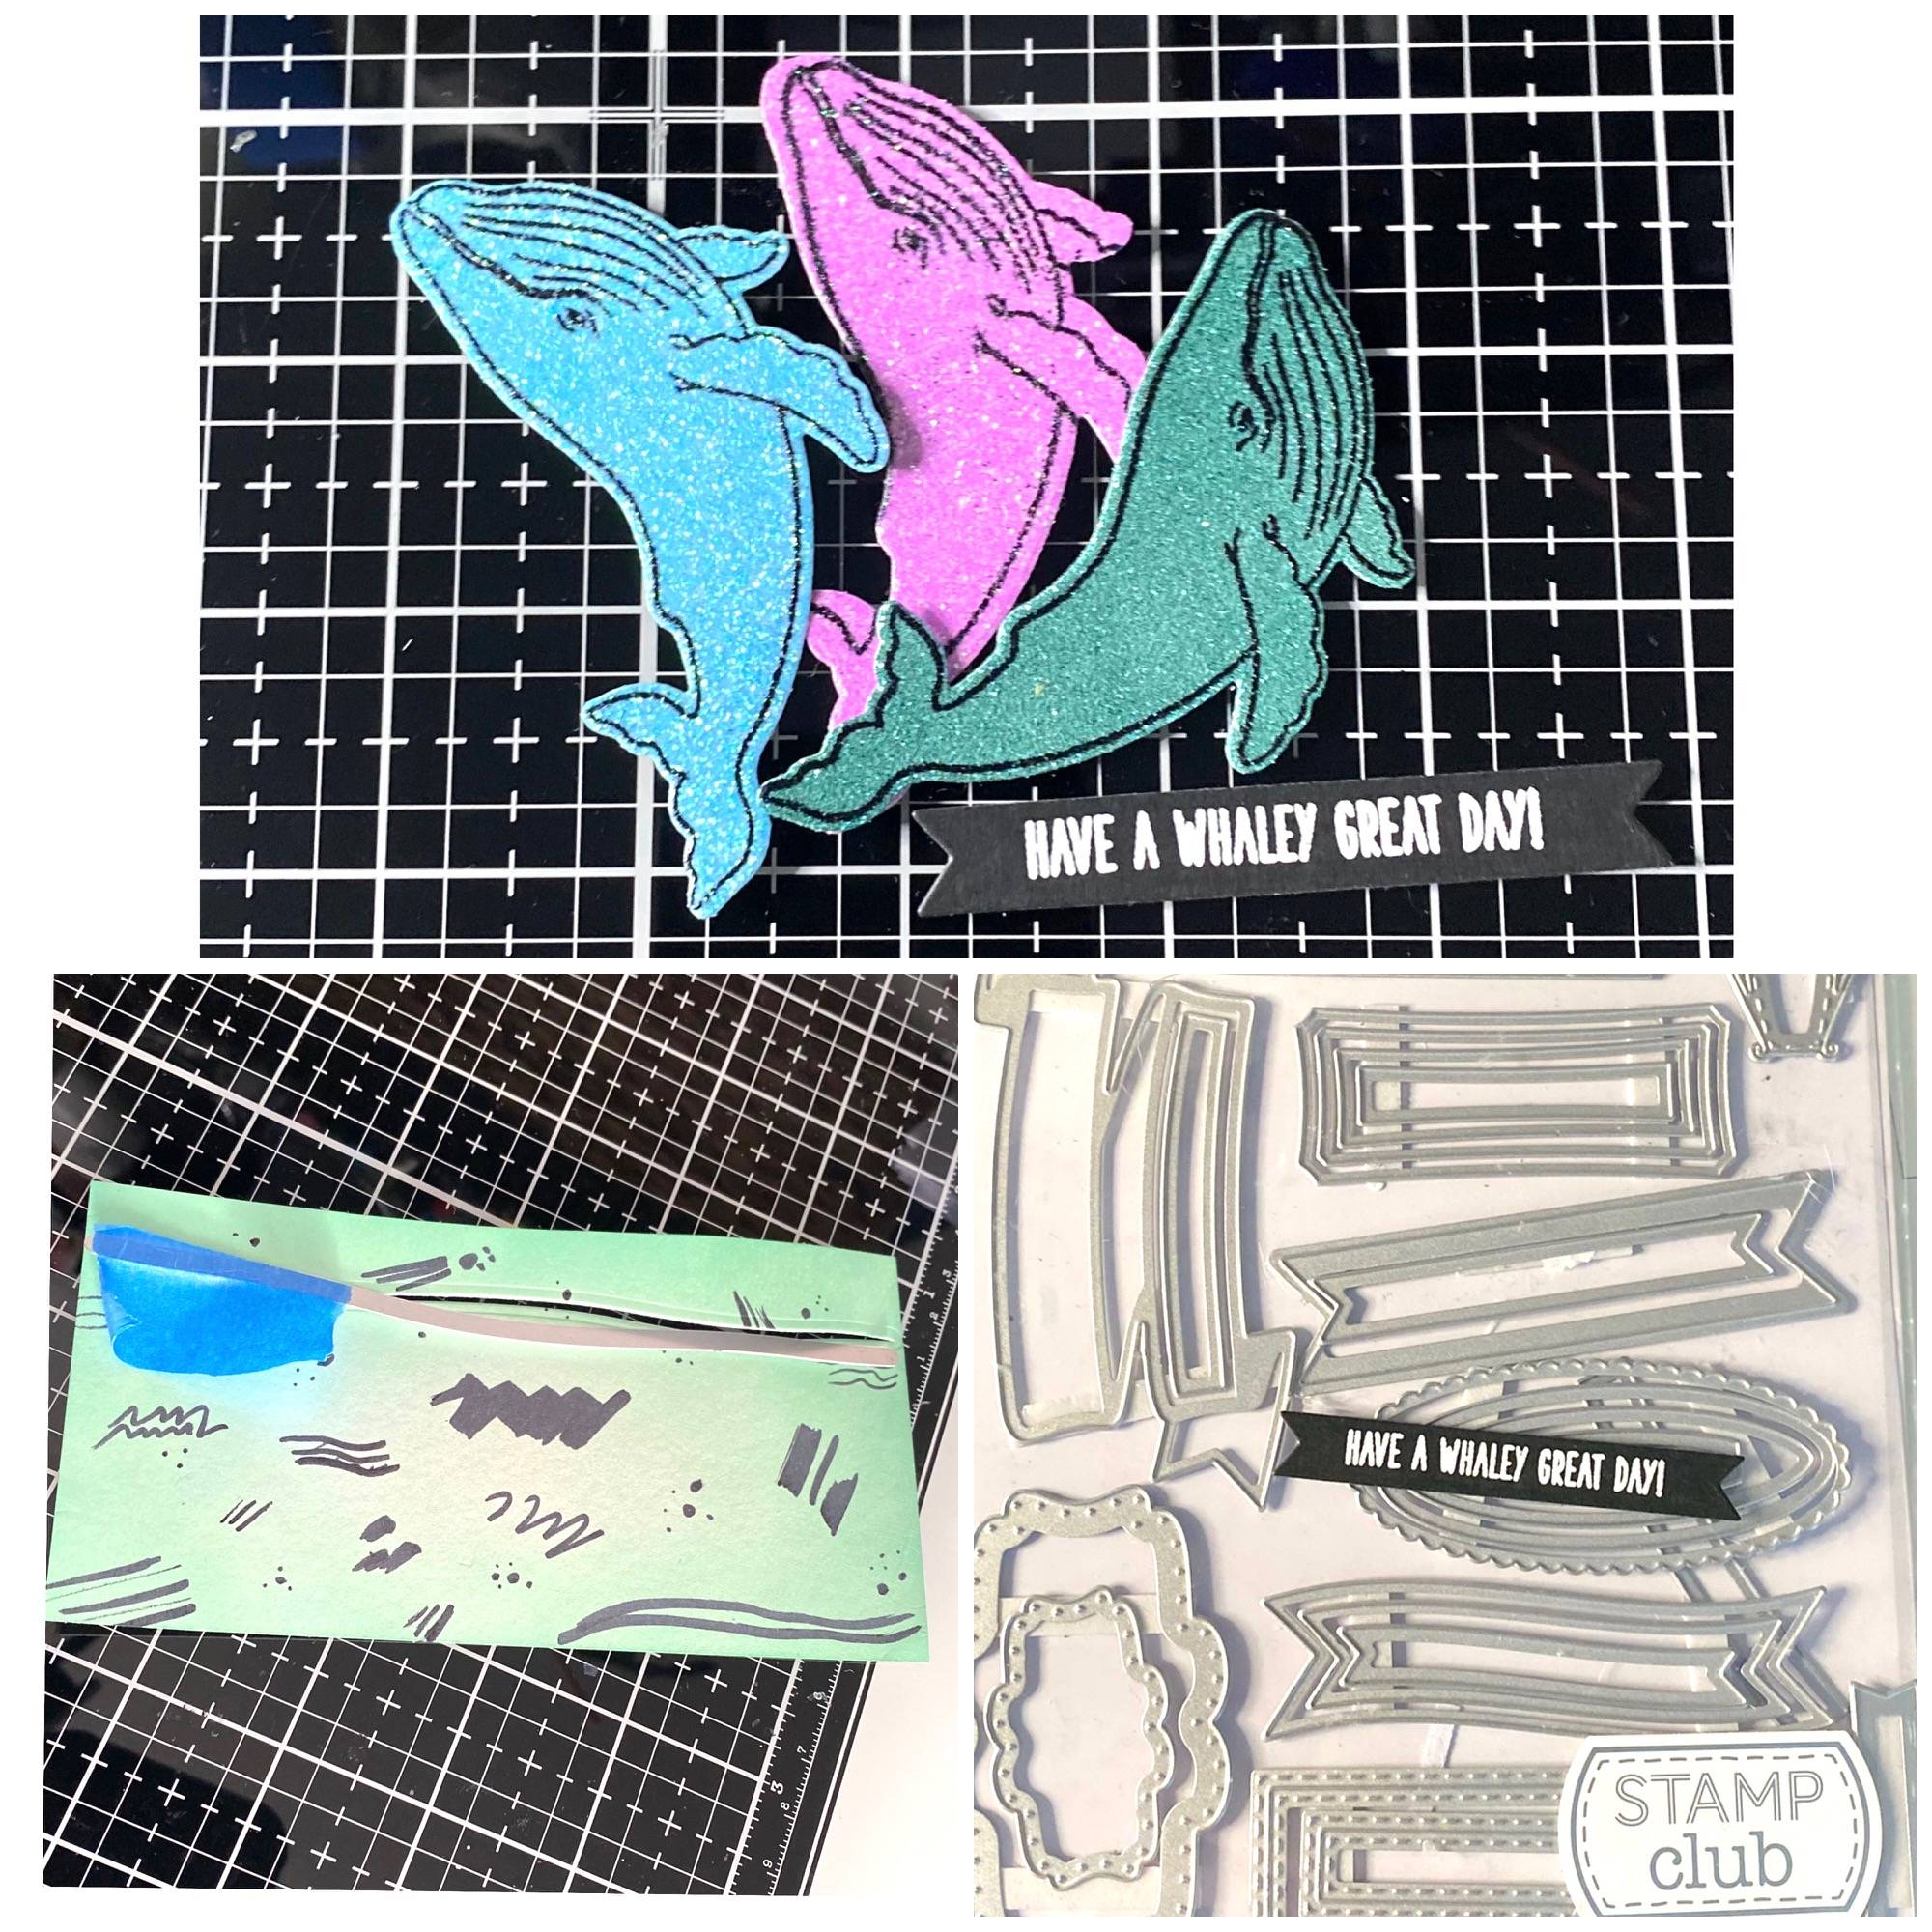
Die cut your sentiment using the banner and strip dies, a trimmer or tear it if you’re feeling artistic. Die cut your whales and the waves using the bendy line die. Don’t know what else to call it. If you want a deeper wave just use your scissors, it’s probably simpler. Definitely keep the scraps, you will use them later.
Step 9
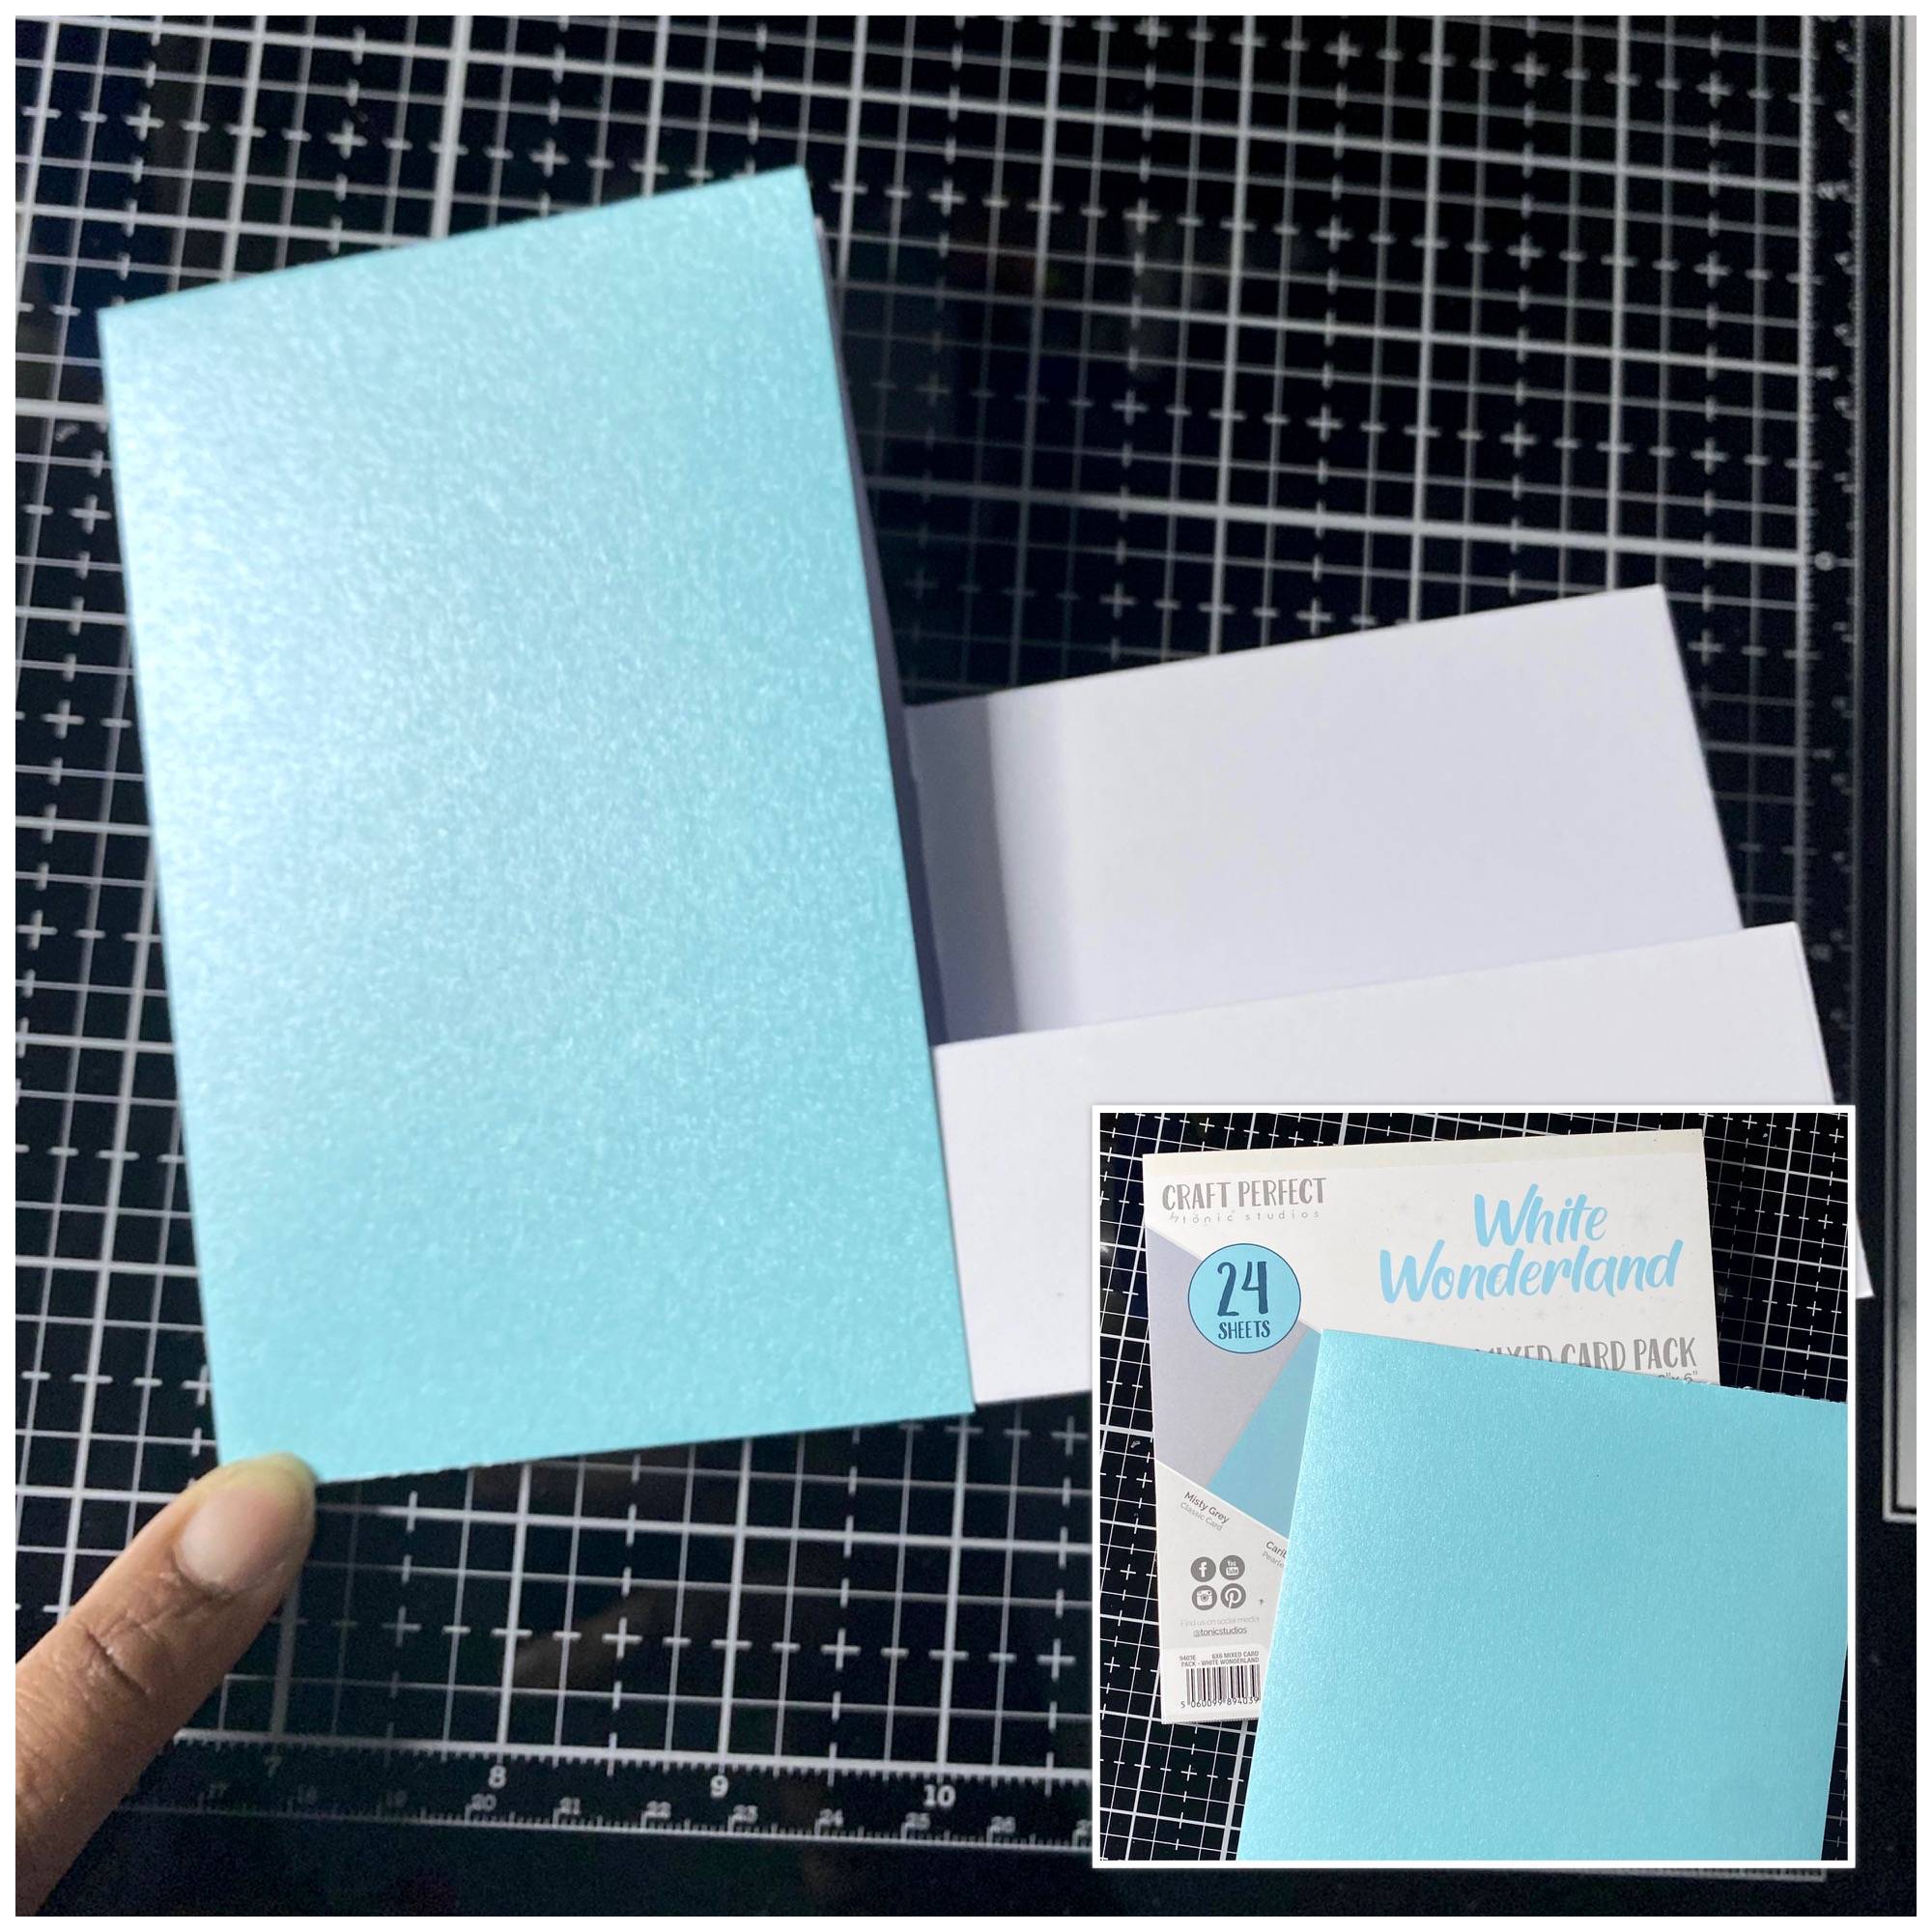
Cut a 3 ½” x 5 ½” and a 2 ½” x 5 ½” pieces of caribbean sea pearlescent card stock. Only lightly ink blend the top and the bottom of the bigger piece using the laguna bay ink.
Step 10

Use this die (refer to picture) from the banners and strip set, to cut a hole in the middle of the piece you just ink blended (or an exacto knife if you are super skilled). This will be your slider tunnel. Make sure you leave about a thumbs width of space at the bottom and the top of your tunnel. Take a coin/ a button and place it behind the tunnel you just made and take a foam square and place it on top of the coin. Stick 1 whale on top of the foam square. Test it to see if it slides up and down.
Step 11
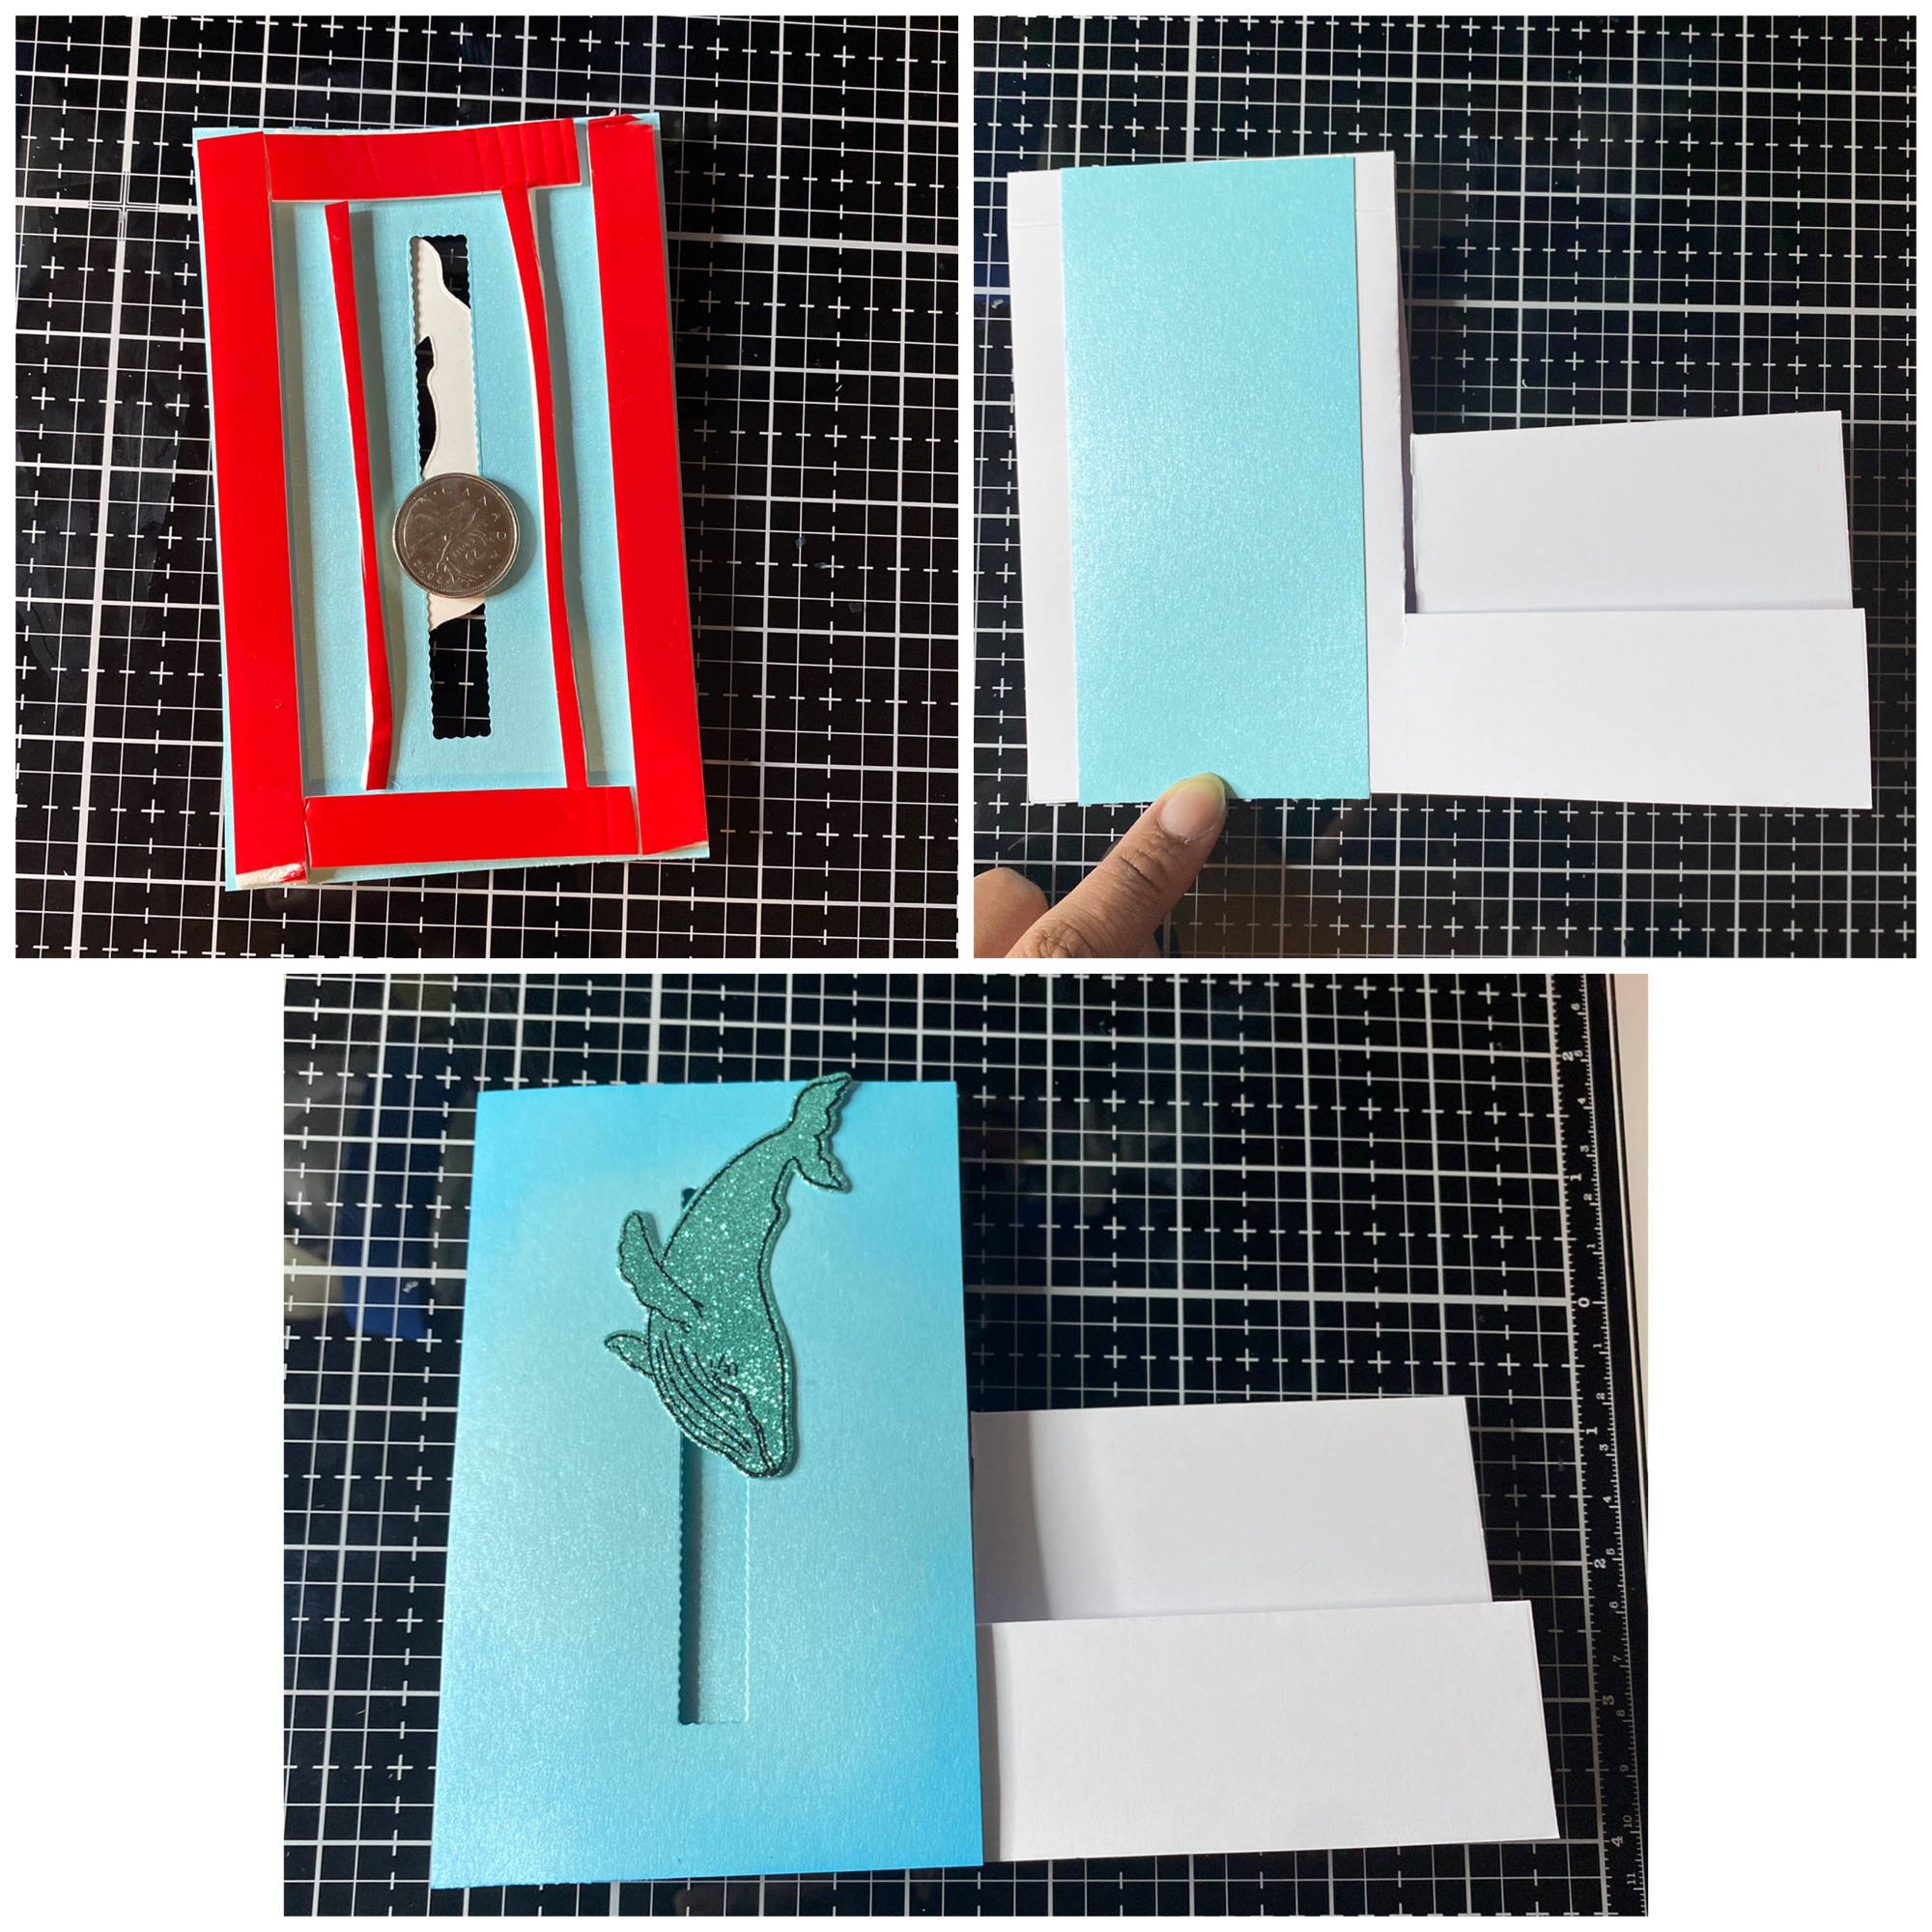
Use doubled up foam tape to create a tunnel for the coin as in the picture. Take the smaller piece of card you cut earlier in step 9 and stick it in the middle of the vertical part of your card. Now take the slider piece you just made and stick it on top. Voila! You made a ½ of the triple S card!
Step 12
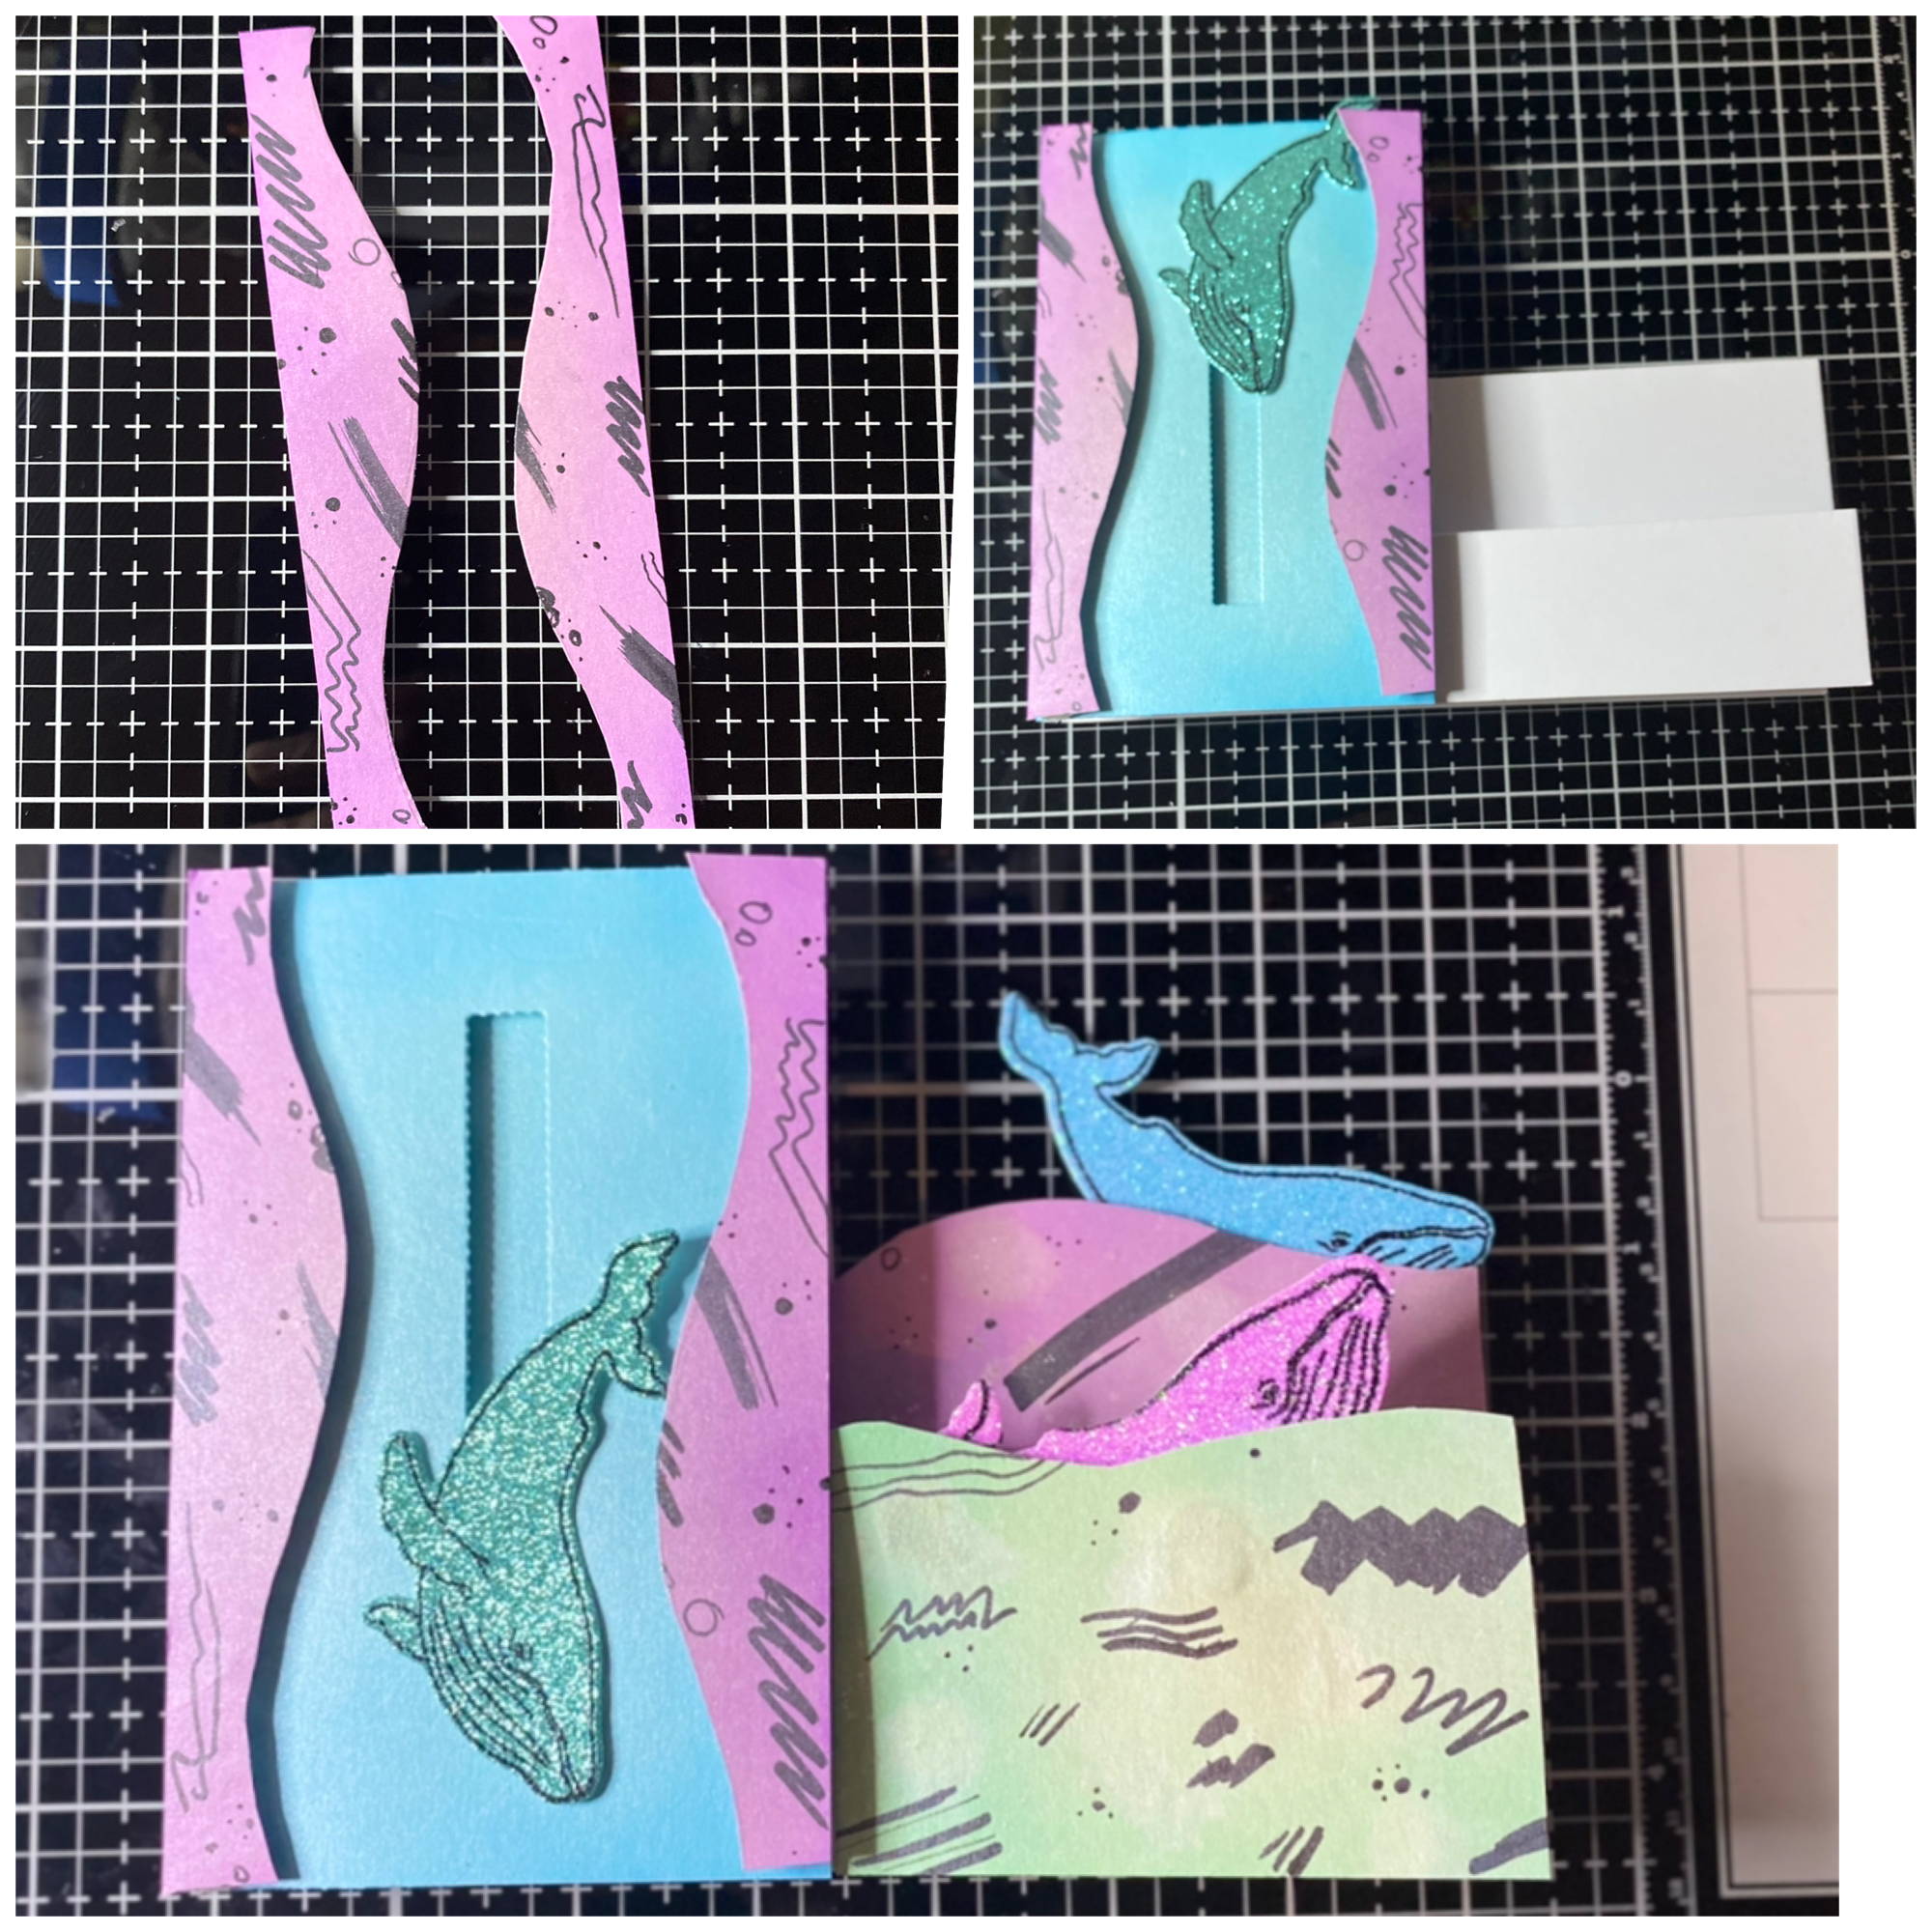
Take your waves and stick them on the mountain folds of your card. Leave a bit of overhang at the top and stick your other whales there, behind the waves. Take the scraps from your waves in step 8, add doubled up foam adhesive and stick them on the vertical edges of the slider side of the card. They will contain your whale.
Step 13
Your water splash should be dry by now. Use your blending brush or finger to add paint to the back of the acetate splash. It’s just to tint it lightly. Fussy cut your splash and the little droplets as well, don’t waste water! Turn over your splash and use the white pen to add an outline and highlights to the splash. Once again it's just a splash, don't be hard on yourself.
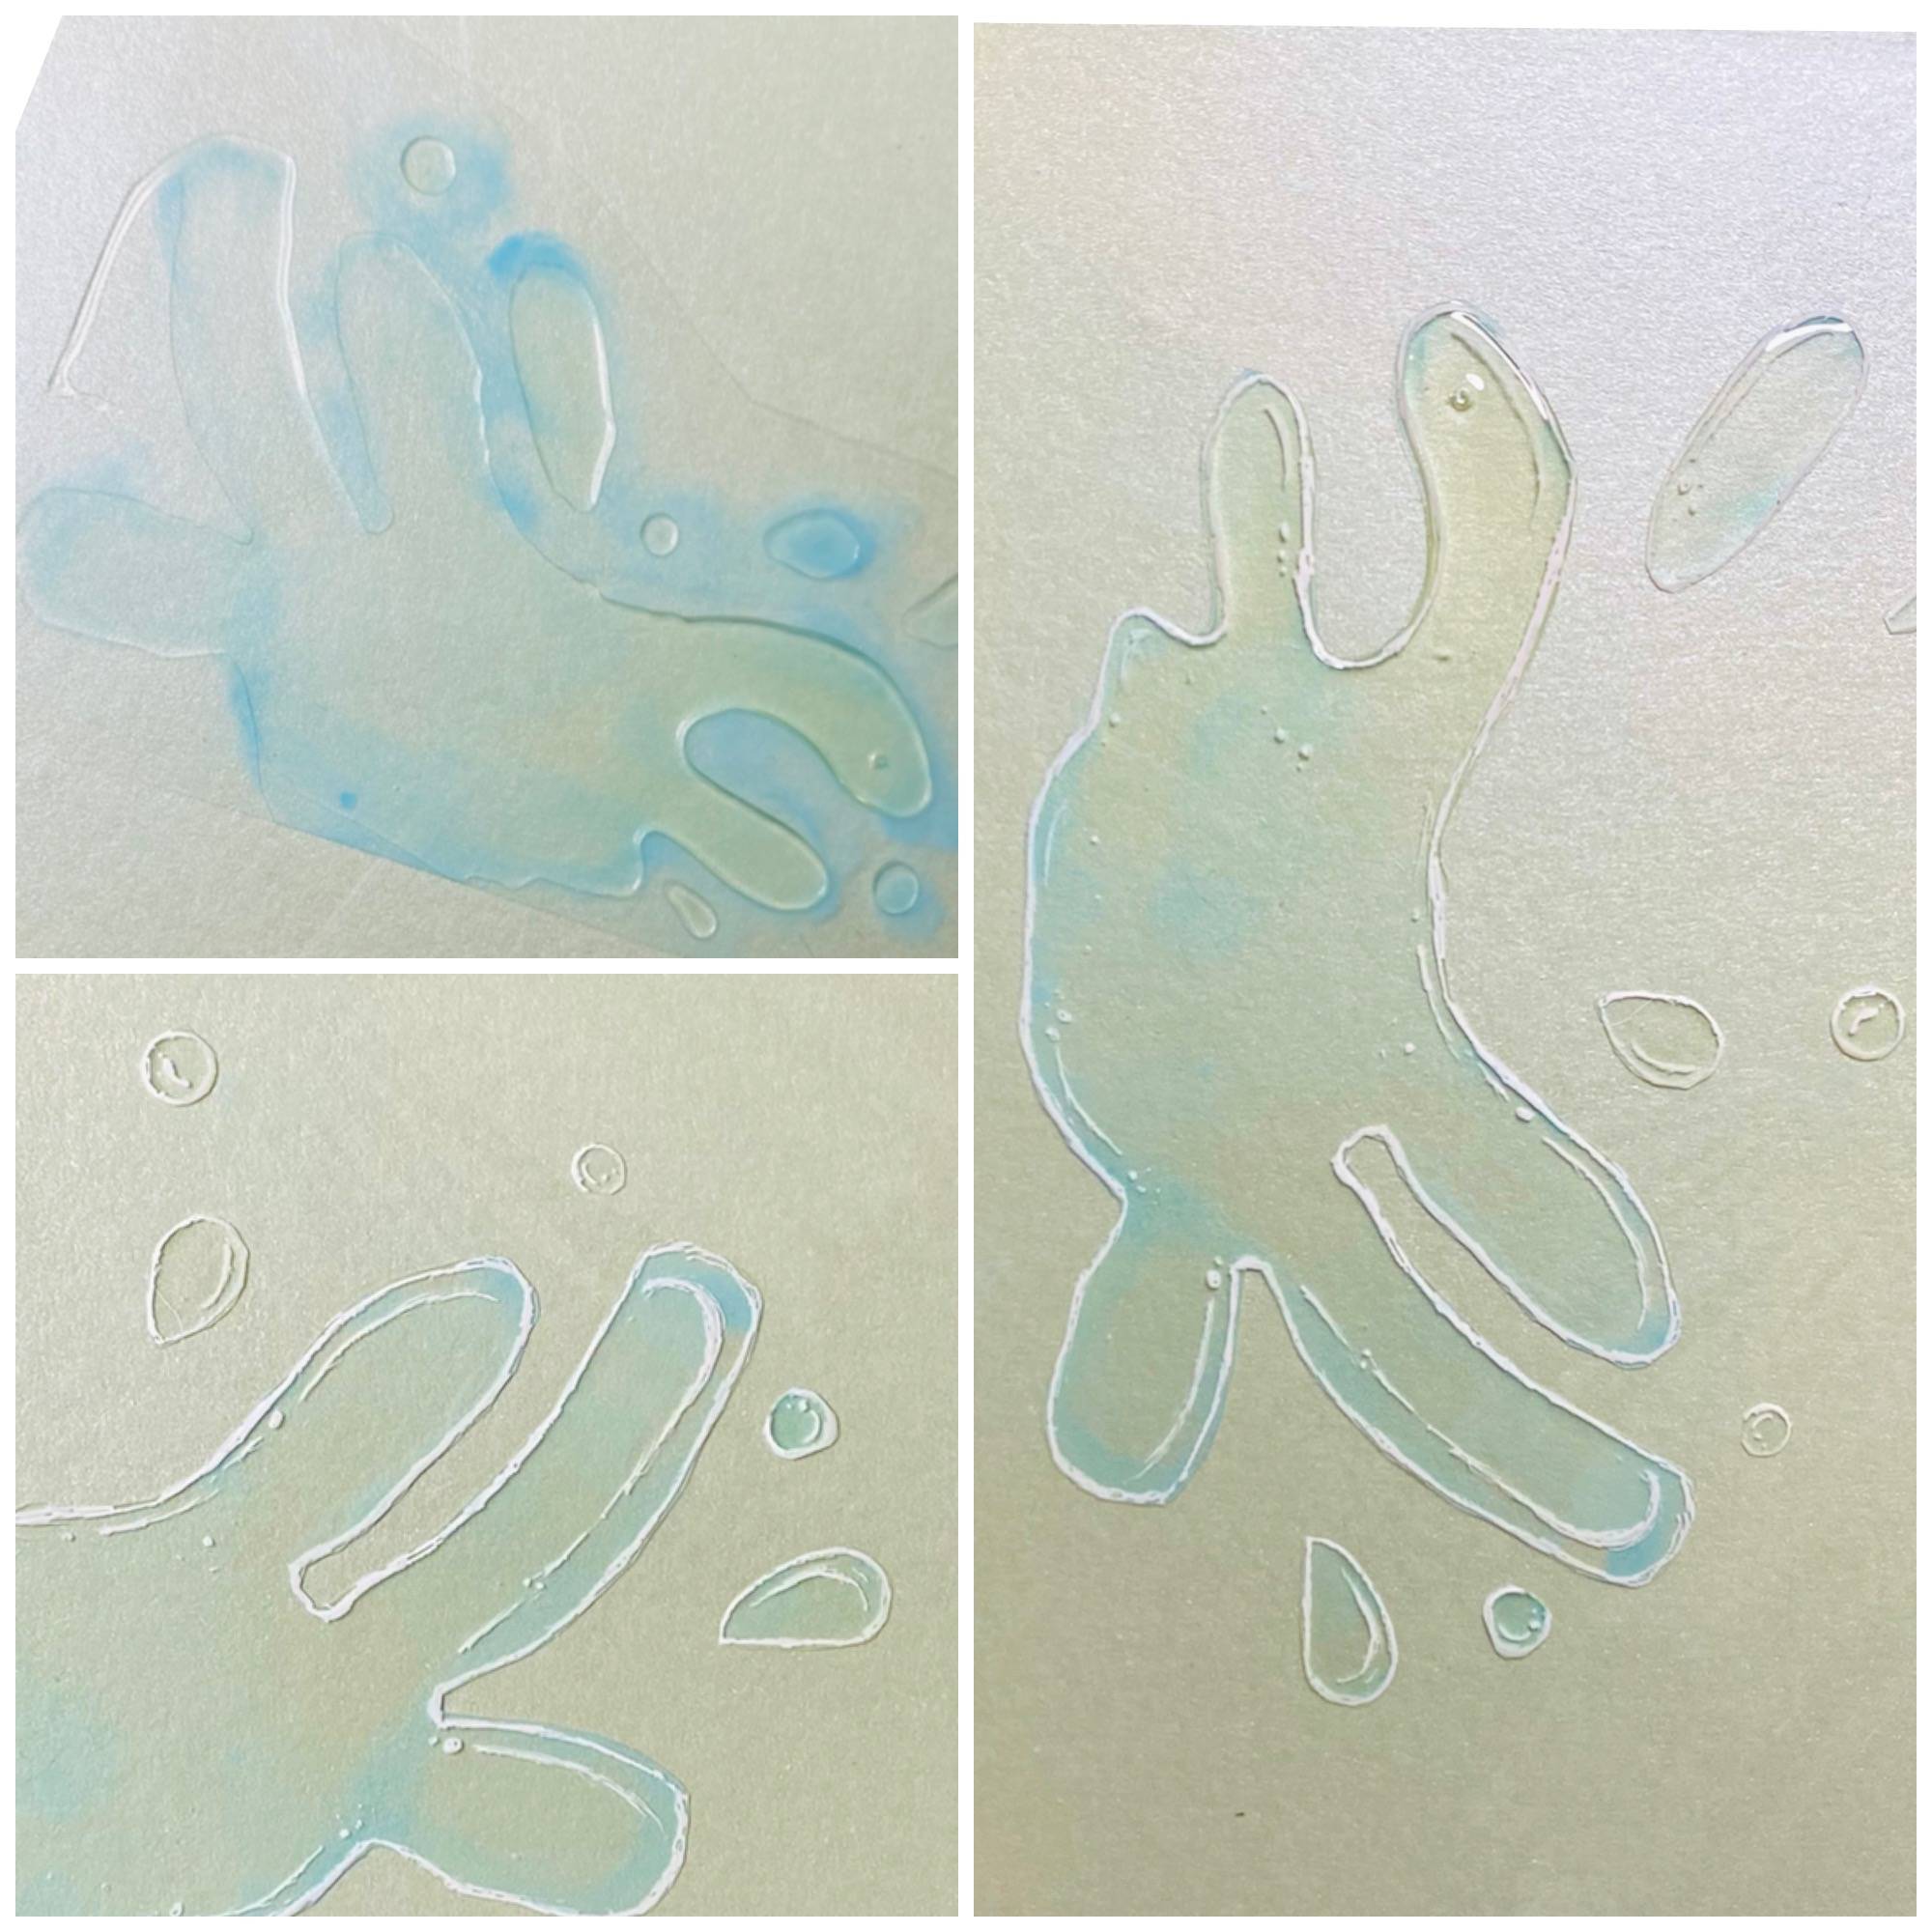
Your water splash should be dry by now. Use your blending brush or finger to add paint to the back of the acetate splash. It’s just to tint it lightly. Fussy cut your splash and the little droplets as well, don’t waste water! Turn over your splash and use the white pen to add an outline and highlights to the splash. Once again it's just a splash, don't be hard on yourself.
Step 14
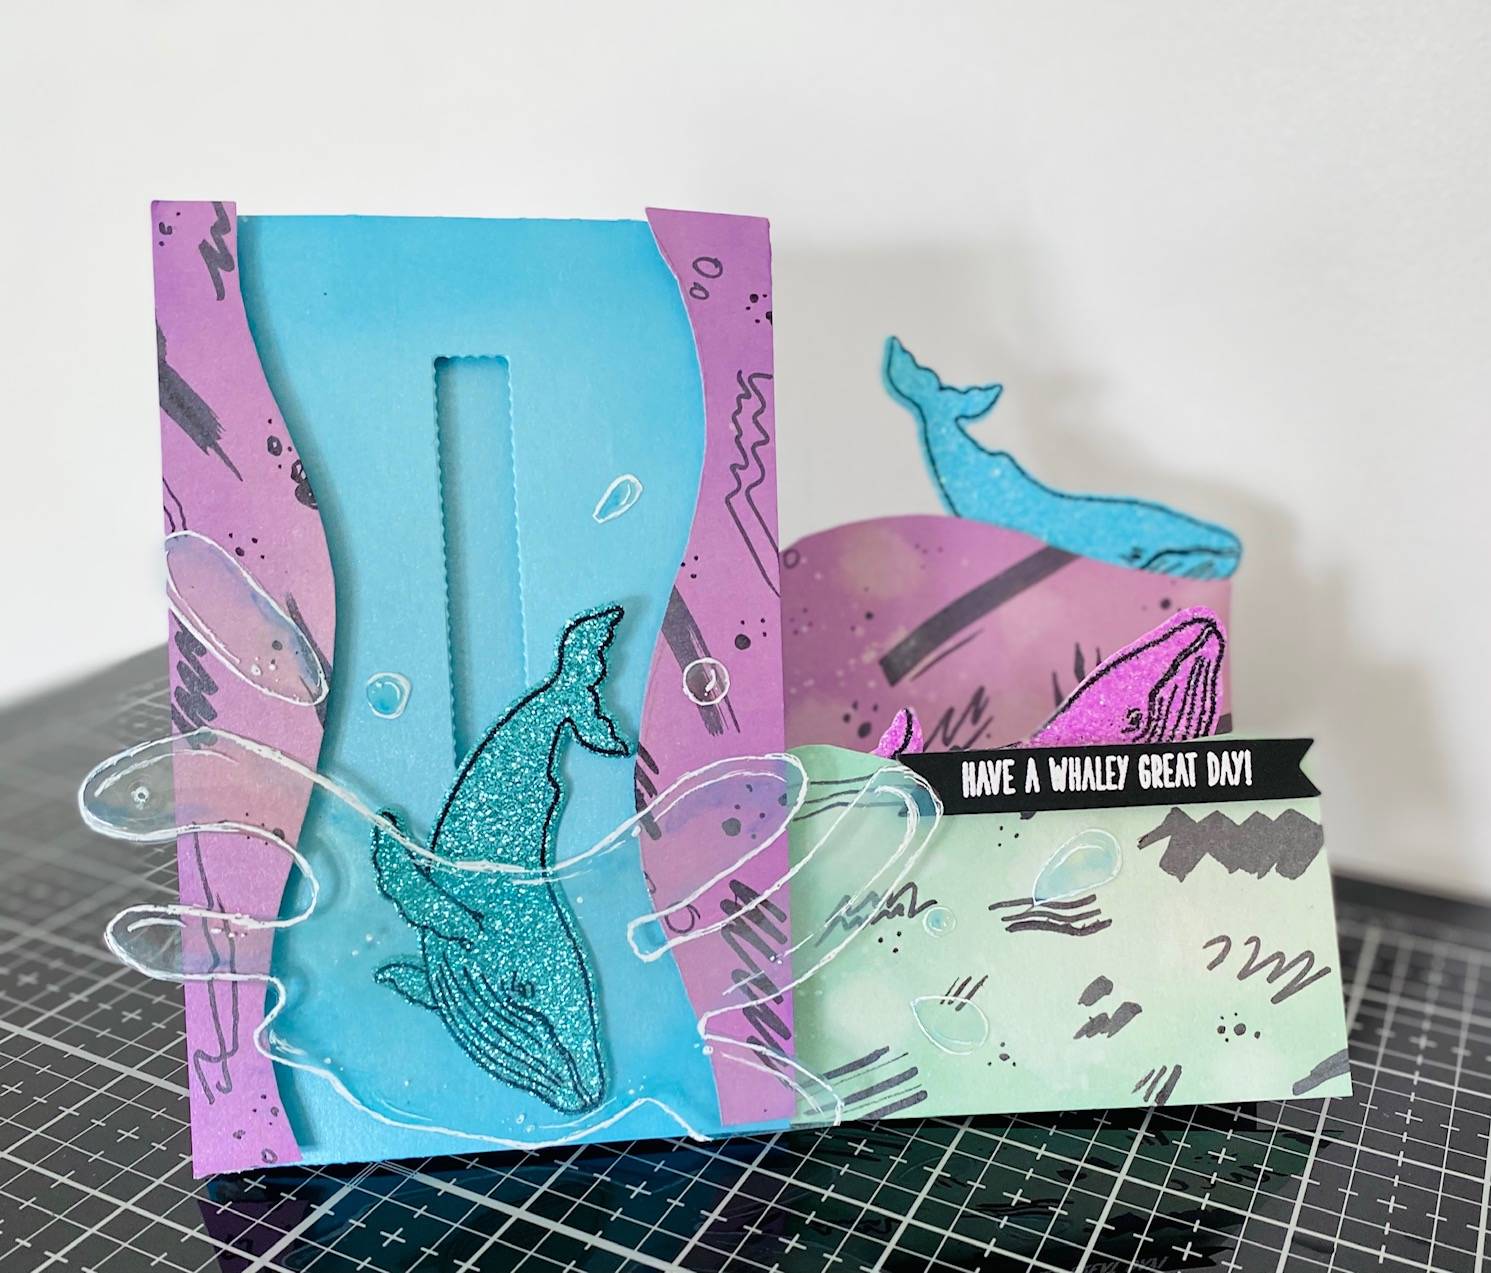
Use clear drying adhesive like the nuvo deluxe adhesive to add your splash to your card. Make sure you leave a gap between the middle of your splash so that the whale can fall into it. Add your sentiment and a bit of shimmer with glitter gloss splatters on your waves and you are done!
I hope you enjoy making this card as much as I did. May the recipient doubly appreciate it for all the effort you put into it! Now that
you’ve made one, bet you can make 20 more right?!
