Hello fellow craft lovers!
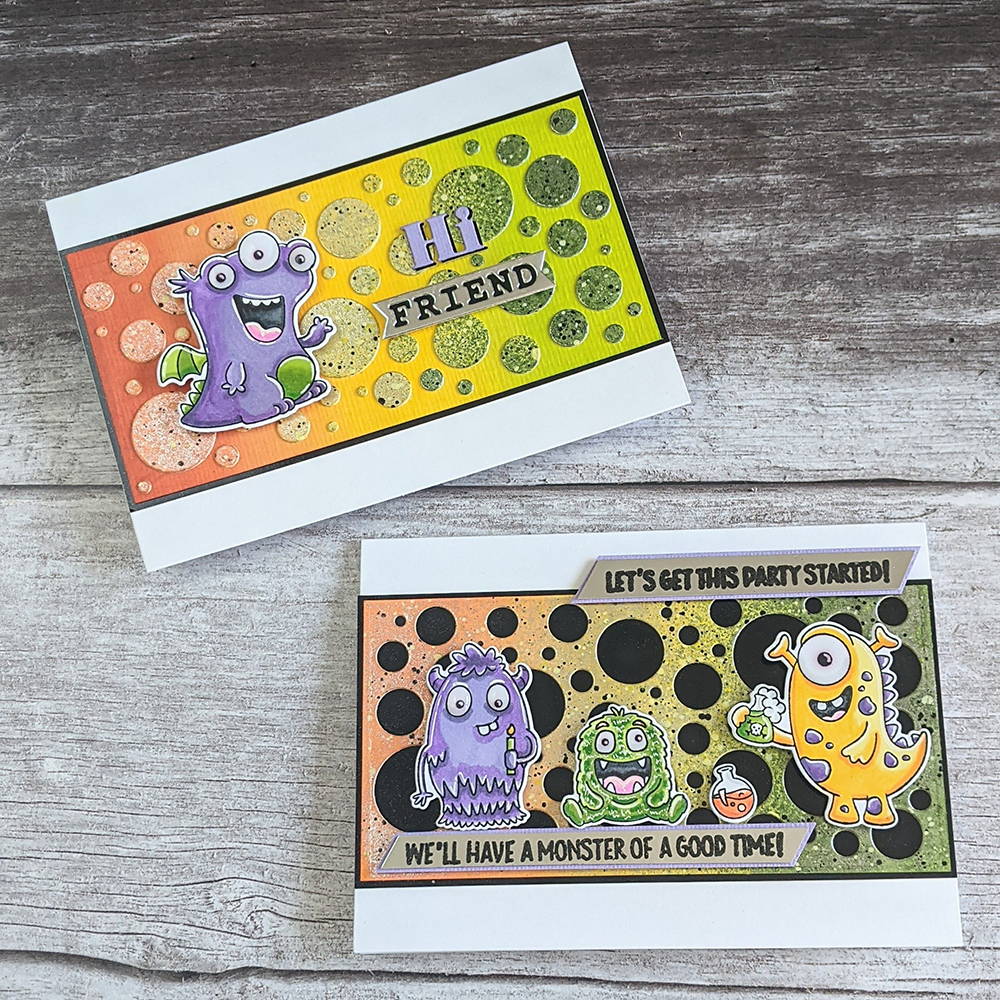
This month at Tonic Studios it’s ‘Ink-tober’, so to help celebrate I have been having a play around with many of Tonic’s fabulous ‘inky’ Nuvo products to create this cute pair of brightly coloured monster cards using the exceptionally fun and newest Stamp Club release called ‘Little Monsters’. I hope you will join me in getting messy and having some inky fun!
To make these card, you will need the following:
- Stamp Club: Little Monsters Stamp and Die Set
- Craft Perfect Watercolour Card
- Thick smooth white cardstock (suitable for ink blending)
- Craft Perfect ‘Glossy Black’ & ‘Chrome Silver’ Mirror Cardstock
- Craft Perfect ‘Mauve Purple’ Classic Card
- Craft Perfect A6 Bright White Card Blanks
- Trimmer or guillotine
- Nuvo Hybrid Inks - Lime Burst, Rubber Duck, Carrot Stick & Black Shadow
- Ink blending brushes or sponges
- Nuvo Sparkle Sprays - Apple Spritzer, Frosted Lemon, & Tender Peach
- Nuvo Aqua Flow Pens - Sliced Kiwi, Mango Mimosa & Tomato Juice
- Nuvo Aqua Flow water brush
- Nuvo Crystal Drops - Simply White, Ebony Black & Morning Dew
- Nuvo Deluxe Adhesive
- Spray bottle of water
- Tangerine Die Cutting Machine
- Paintbrush
- Low tack tape or washi tape
- Nuvo Alcohol Markers
- White Gel Pen
- Nuvo Clear Mark Embossing Pad
- Nuvo Embossing Powder - Jet Black
- Heat tool
Step 1

Using a trimmer or guillotine, cut:
● x1 piece of watercolour card to measure 3 x 6”
● x1 piece of thick smooth white cardstock (suitable for blending inks) to 3 x 6”
● x2 pieces of Craft Perfect ‘Glossy Black’ Mirror Cardstock to measure 8 x 15.6cm
Finally, trim 2mm off the bottom of x2 A6 Card Blanks (if you are looking at them in portrait orientation).
Step 2
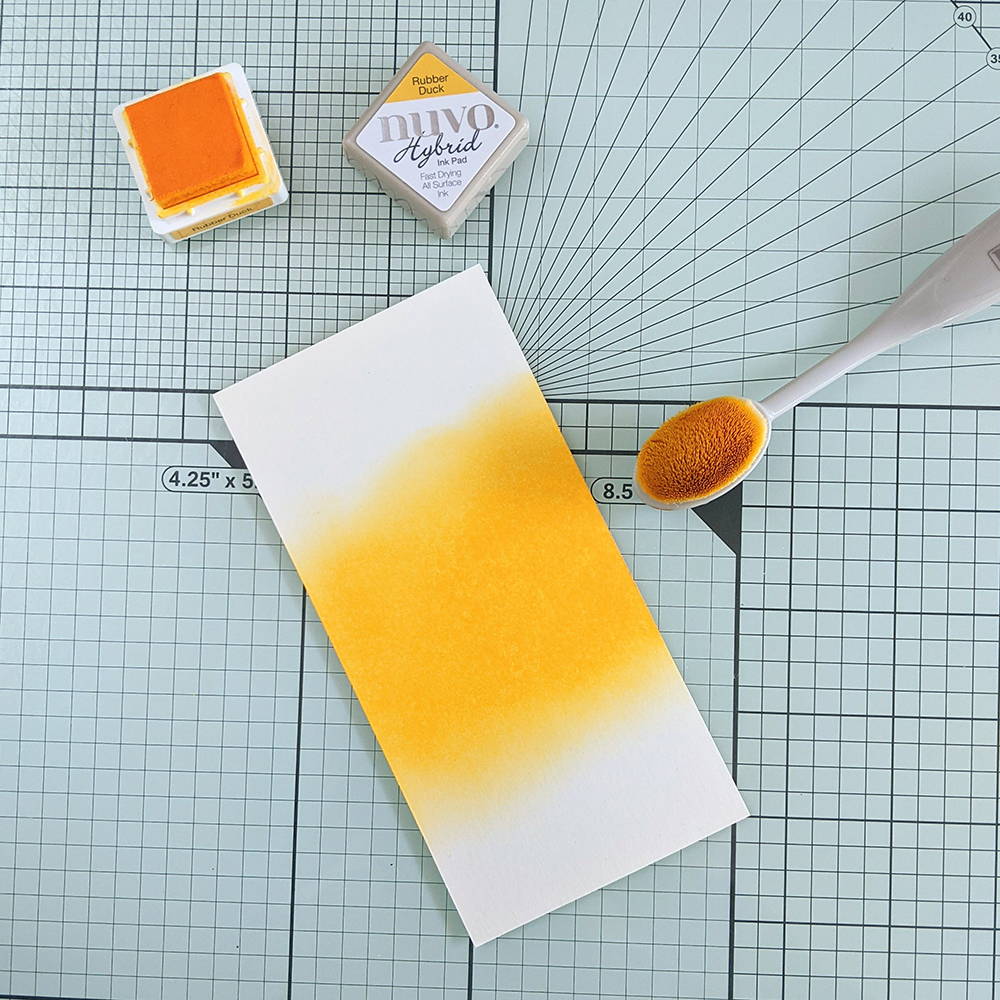
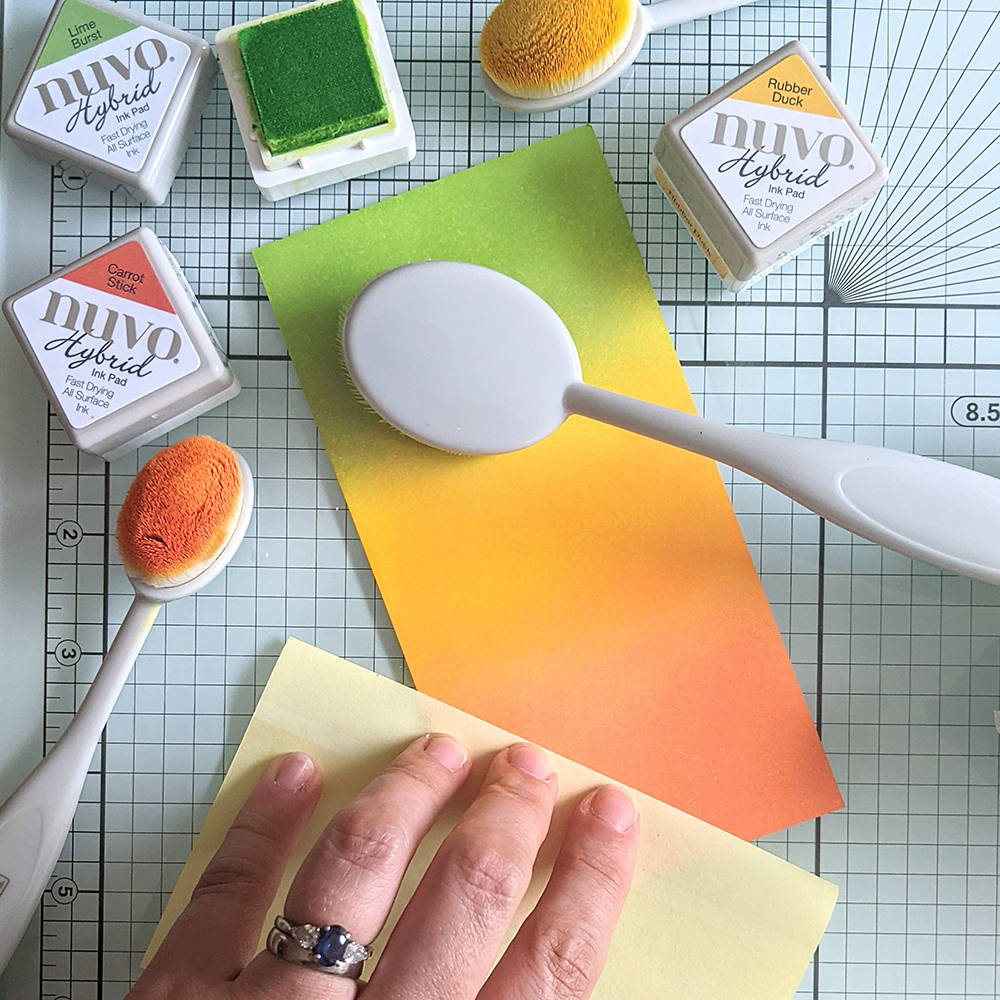
On the smooth cardstock panel, start by by blending your yellow ink in the centre of the panel, in circular motions. Then add the green and orange inks on either end, blending into the yellow.
TIP: If you are anything like me, I’m quite a messy crafter (inky fingers get everywhere!) So I find it can be helpful to rest my fingers on something like a post-it-note (sticky side up) so that I don’t leave unwanted finger prints in where I’ve already inked and end up transferring them where I don’t want them!
Step 3
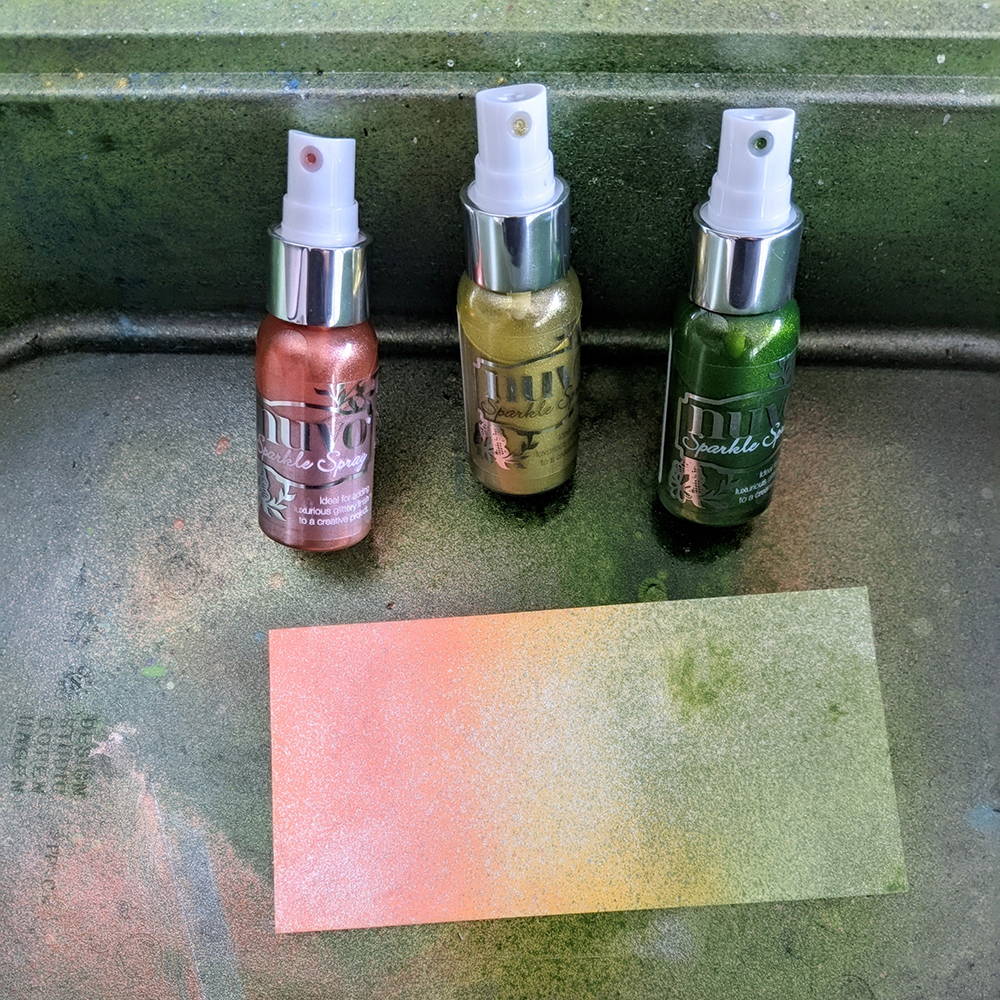
Holding the bottle approximately 10-15cm away, add a couple of sprays of each coordinating Shimmer Spray over the top of your inked areas. The sparkle spray can be heat dried with a heat tool to save on time or left to dry naturally.
* Sparkle sprays are some of my absolute favourite Nuvo products but they can get pretty messy! I highly recommend spraying directly into some sort of low-sided box. Here I have used a plastic tray but an old cardboard box (like the ones you recieve all of those lovely Tonic goodies in) is perfect.
Step 4

Once dry, it’s time to add some splats! Separately, squeeze out a small amount of white and black Crystal Drops and mix with a little water to get the perfect ‘flicking’ consistency. Using a paintbrush, ‘flick away’ at your page to create a random effect. Apply as little or as much as you fancy.
I absolutely LOVE having a play around with this effect. It too can get rather messy though, so you may choose to do this in your ‘spray box’ as well.
Step 5
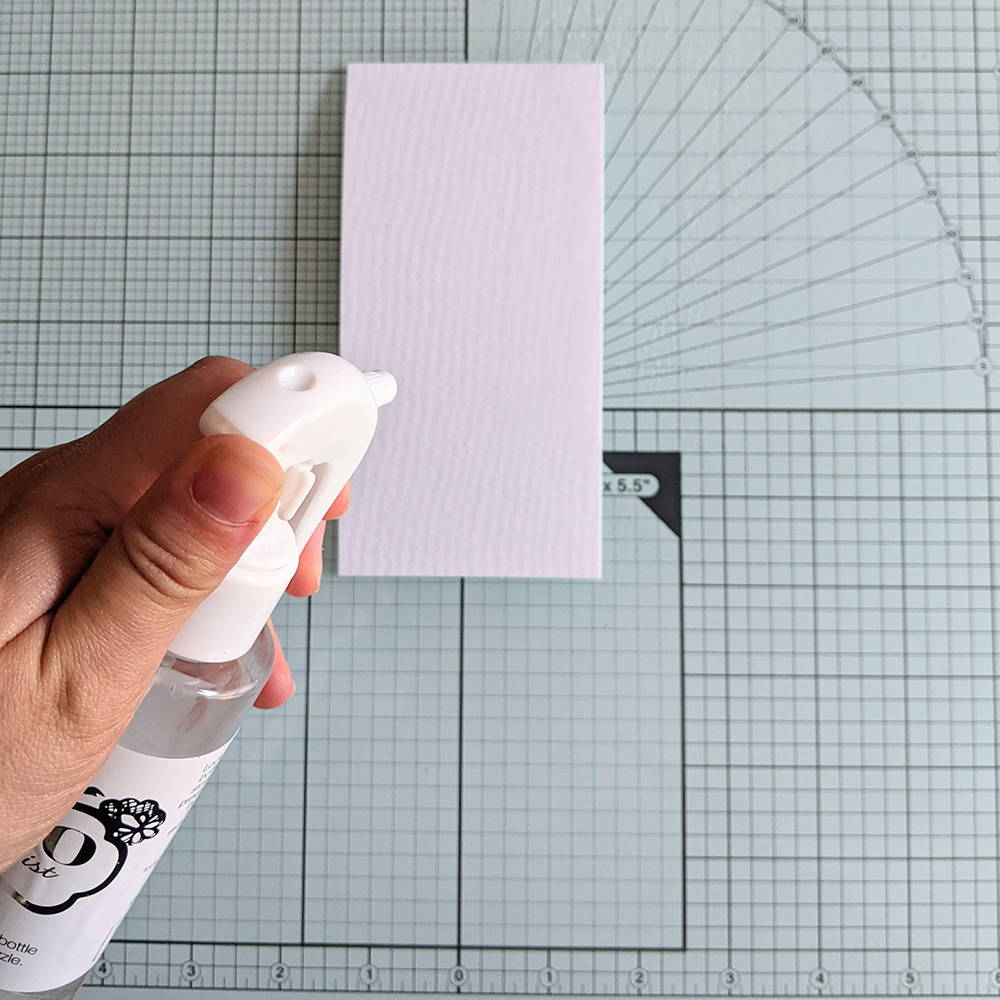
While you wait for your Crystal Drops to dry, take your watercolour card panel and spray with water.
Starting at the top, apply your green Aqua Flow Ink to the page, going a little over a third of the way down.
You can either work directly from the pen or squeeze out a small amount of ink onto a glass mat and apply using a water brush. Repeat this with the yellow ink, blending into the green.
To make a slightly more orange tone, I mixed the ‘Tomato Juice’ and ‘Mango Mimosa’ together. (Don’t think I’d fancy that combination as an actual cocktail mind you!)
I then blended the new colour into the yellow in the same way as before.
To make a slightly more orange tone, I mixed the ‘Tomato Juice’ and ‘Mango Mimosa’ together. (Don’t think I’d fancy that combination as an actual cocktail mind you!)
I then blended the new colour into the yellow in the same way as before.

While you wait for your Crystal Drops to dry, take your watercolour card panel and spray with water.
Starting at the top, apply your green Aqua Flow Ink to the page, going a little over a third of the way down.
You can either work directly from the pen or squeeze out a small amount of ink onto a glass mat and apply using a water brush. Repeat this with the yellow ink, blending into the green.
To make a slightly more orange tone, I mixed the ‘Tomato Juice’ and ‘Mango Mimosa’ together. (Don’t think I’d fancy that combination as an actual cocktail mind you!)
I then blended the new colour into the yellow in the same way as before.
Step 6
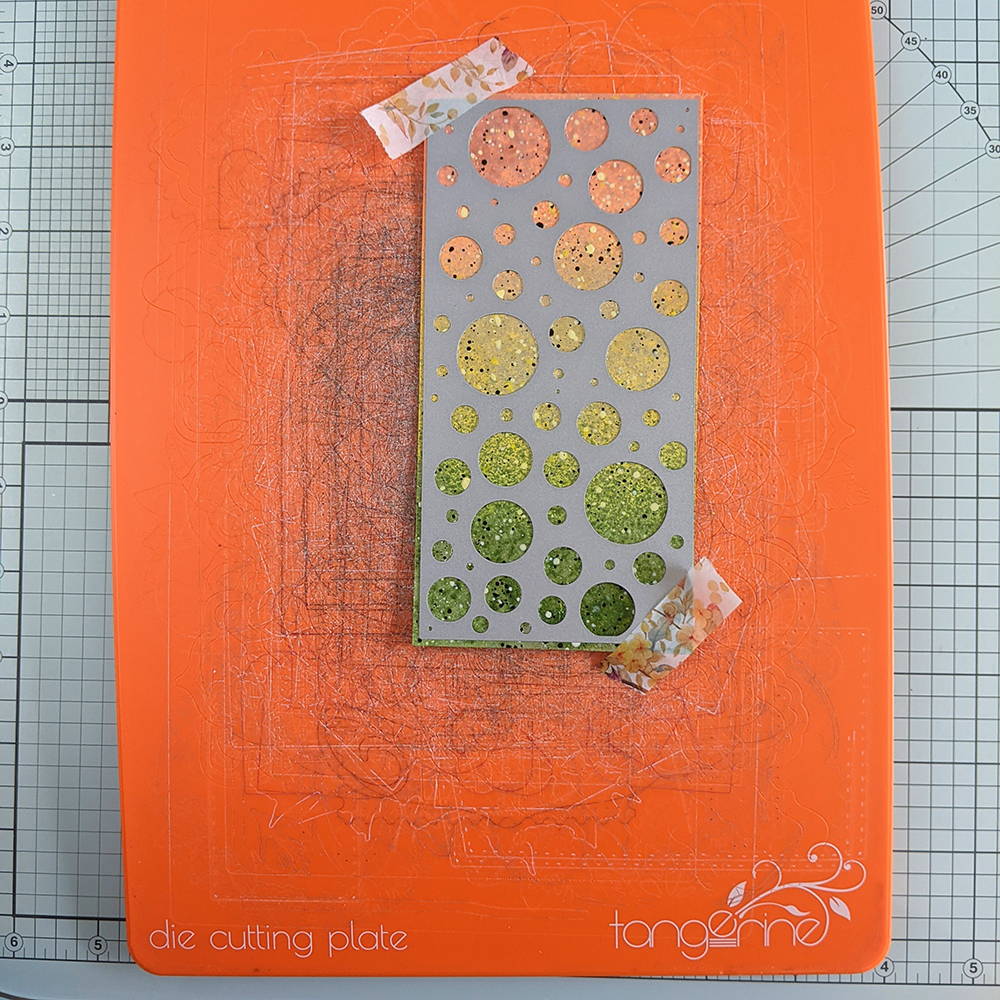

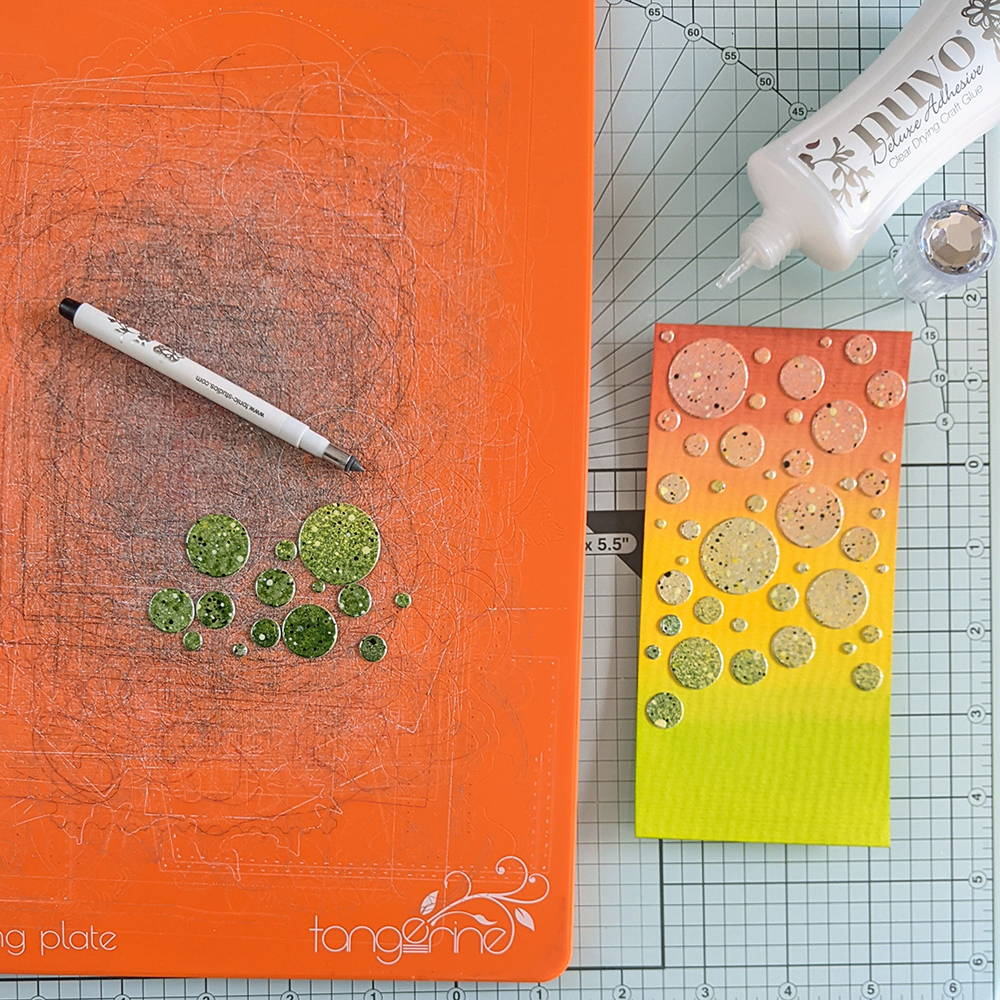
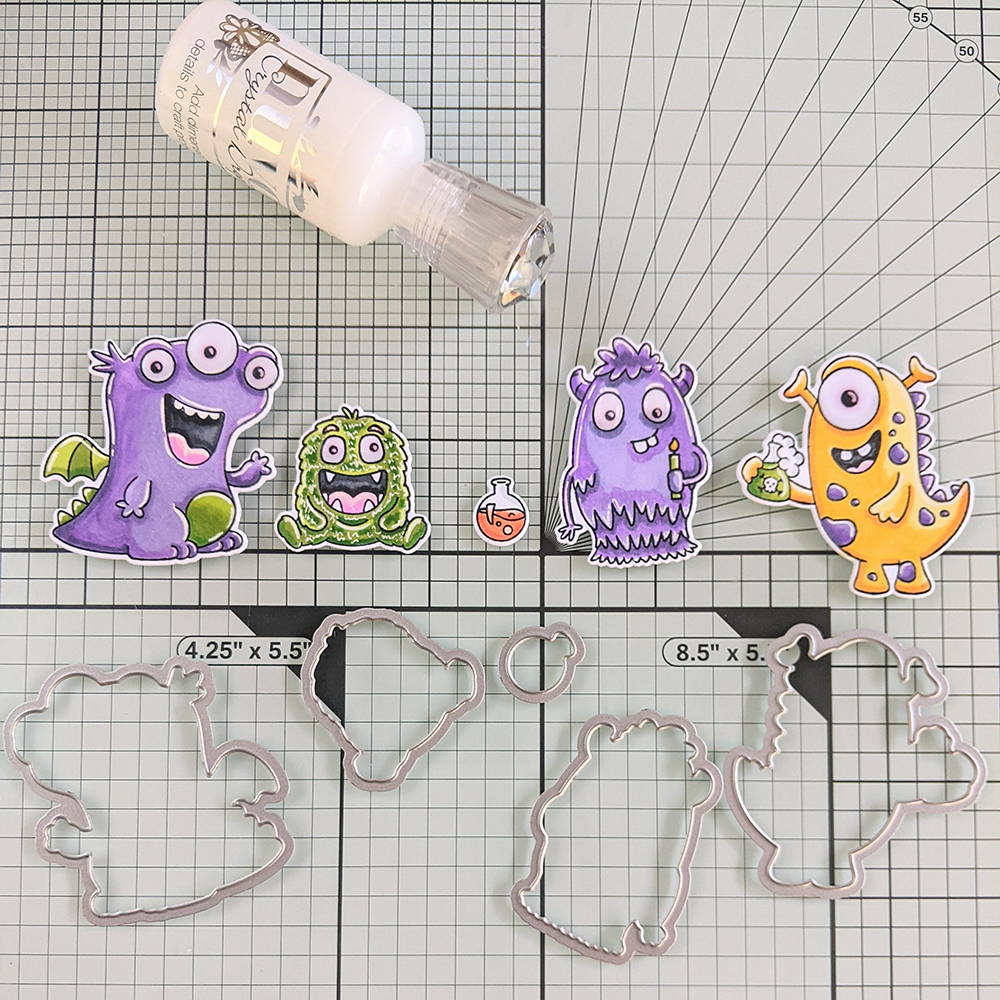
Ensuring the entire ‘splat’ panel is dry, secure into place the circles die from the Stamp Club set and run through your die cutting machine. Ensure you keep both the panel as well as all of the individual circle die cuts.

Ensuring the entire ‘splat’ panel is dry, secure into place the circles die from the Stamp Club set and run through your die cutting machine. Ensure you keep both the panel as well as all of the individual circle die cuts.
Step 7
Take your watercolour card panel and glue the corresponding colour circles over the top to create a ‘random’ dotty effect.
Step 8
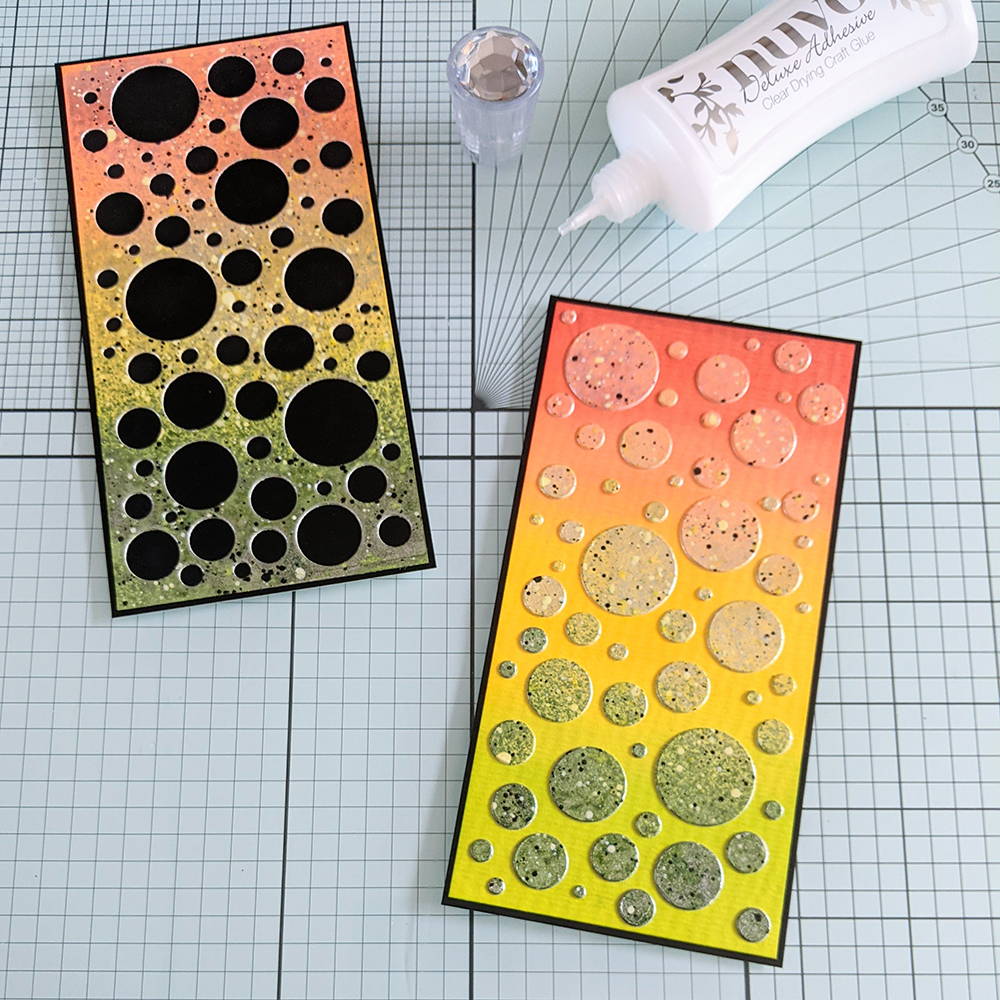
Next, apply some adhesive to your die cut panel and stick to one of your glossy black panels, ensuring a thin, even border all the way around the edges.
Stick the watercolour card panel to the second glossy black base.
Step 9

Attach the bases to your card blanks as shown.
Step 10
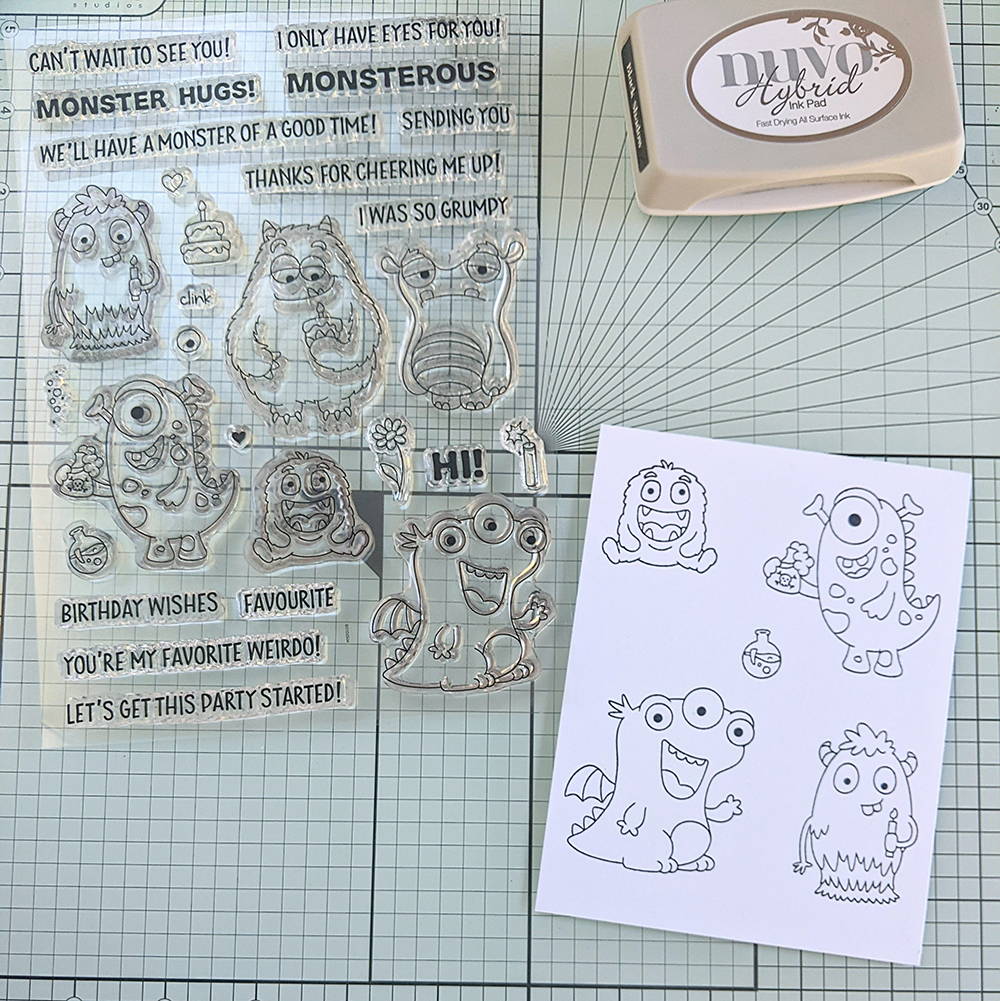
Onto white cardstock, stamp out the four monsters as well as the flask image.
Step 11
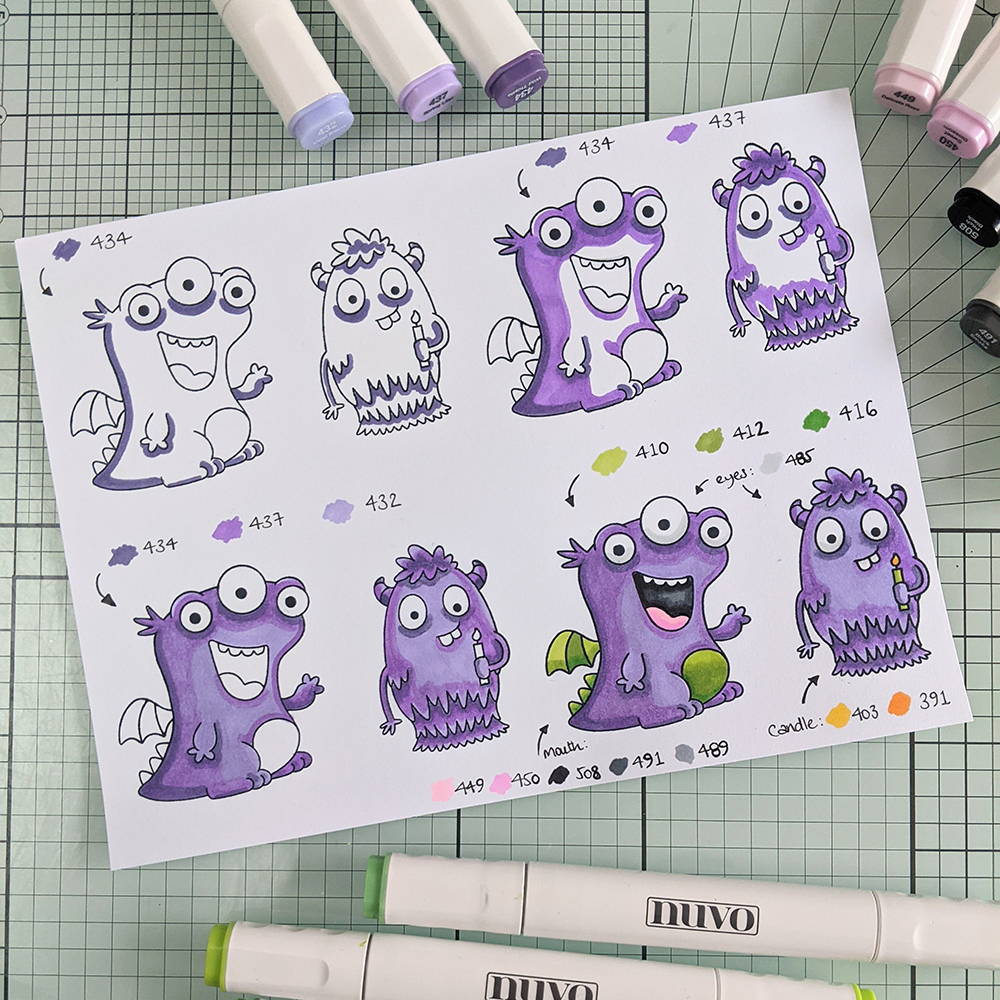
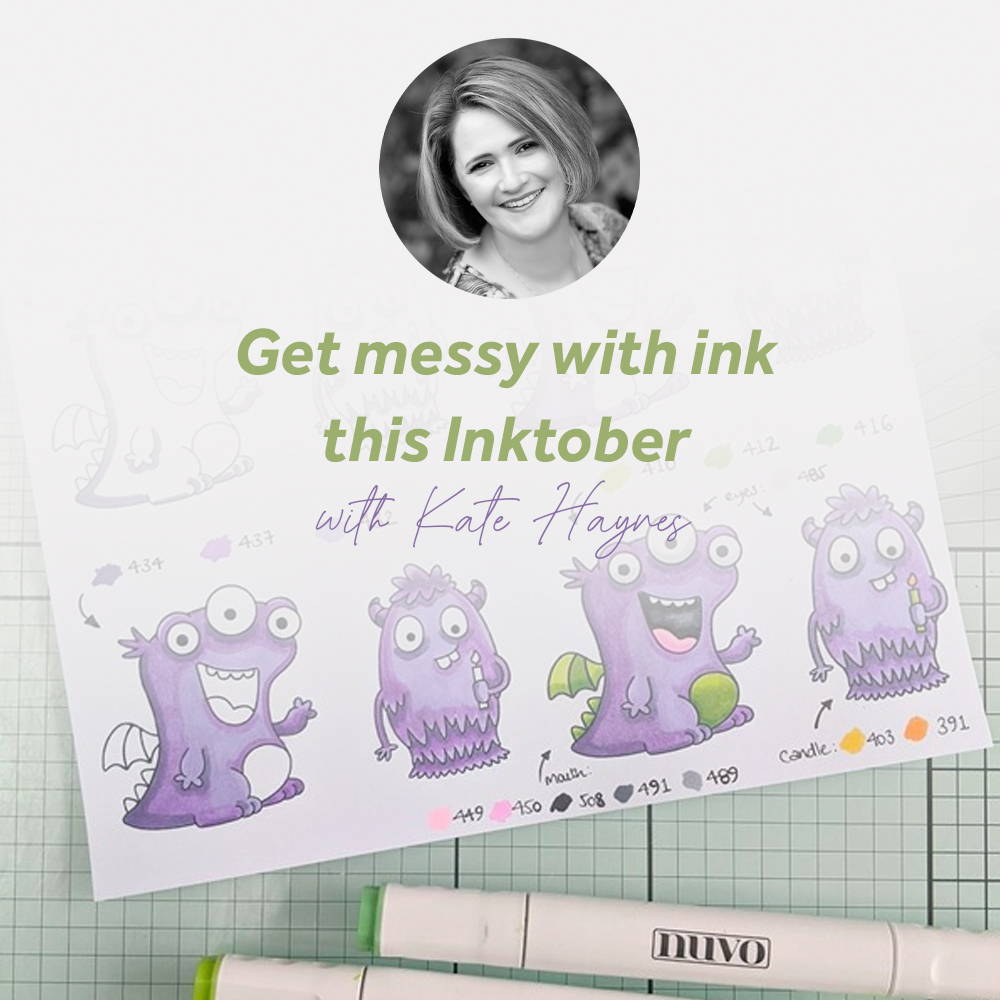
Colour your stamped images using alcohol markers. In the above photos is a guide to show the stages of how I coloured mine in and which colours I used.
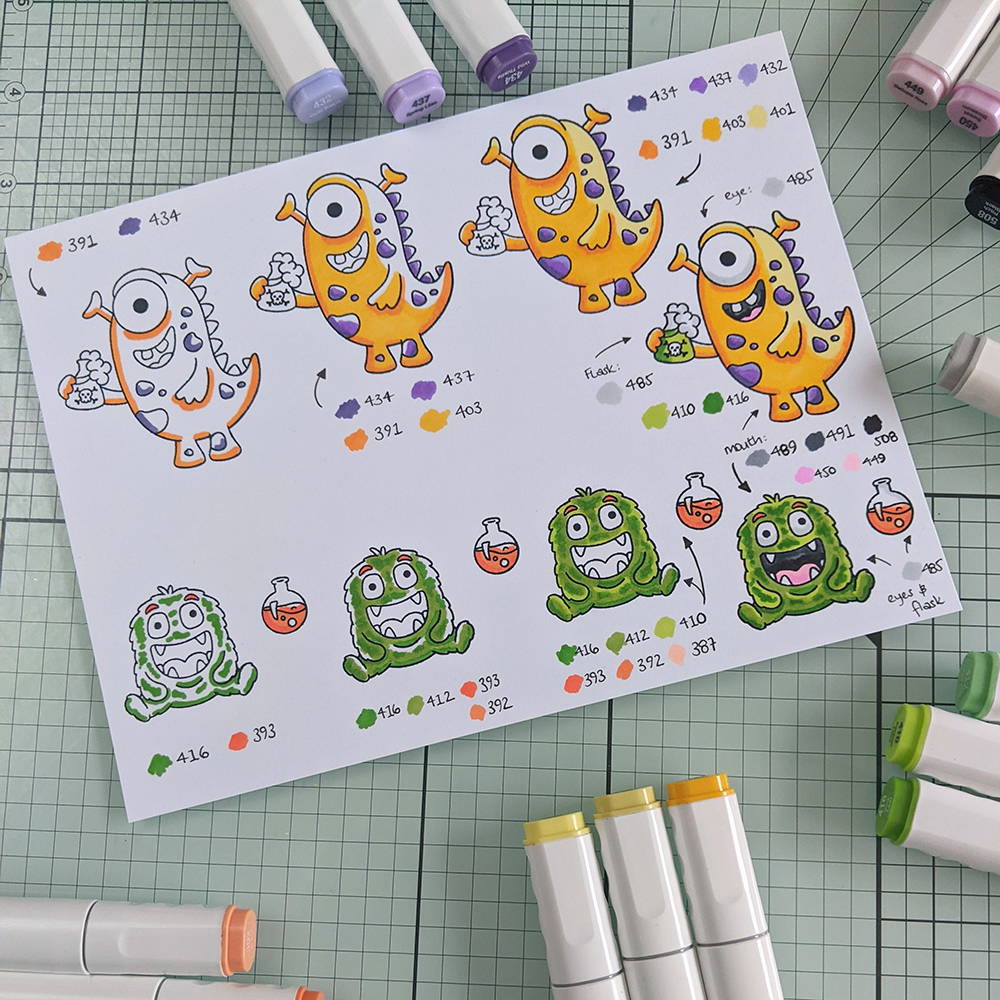
Colour your stamped images using alcohol markers. In the above photos is a guide to show the stages of how I coloured mine in and which colours I used.
Step 12
Cut out the stamped coloured images using the corresponding dies.
Using a white gel pen, add in some ‘light’ details and the ‘fuzzy’ fur effect to the baby monster.
Finally, apply Clear Crystal Drops over the monsters’ eyes to give them a glossy eye effect.
Step 13
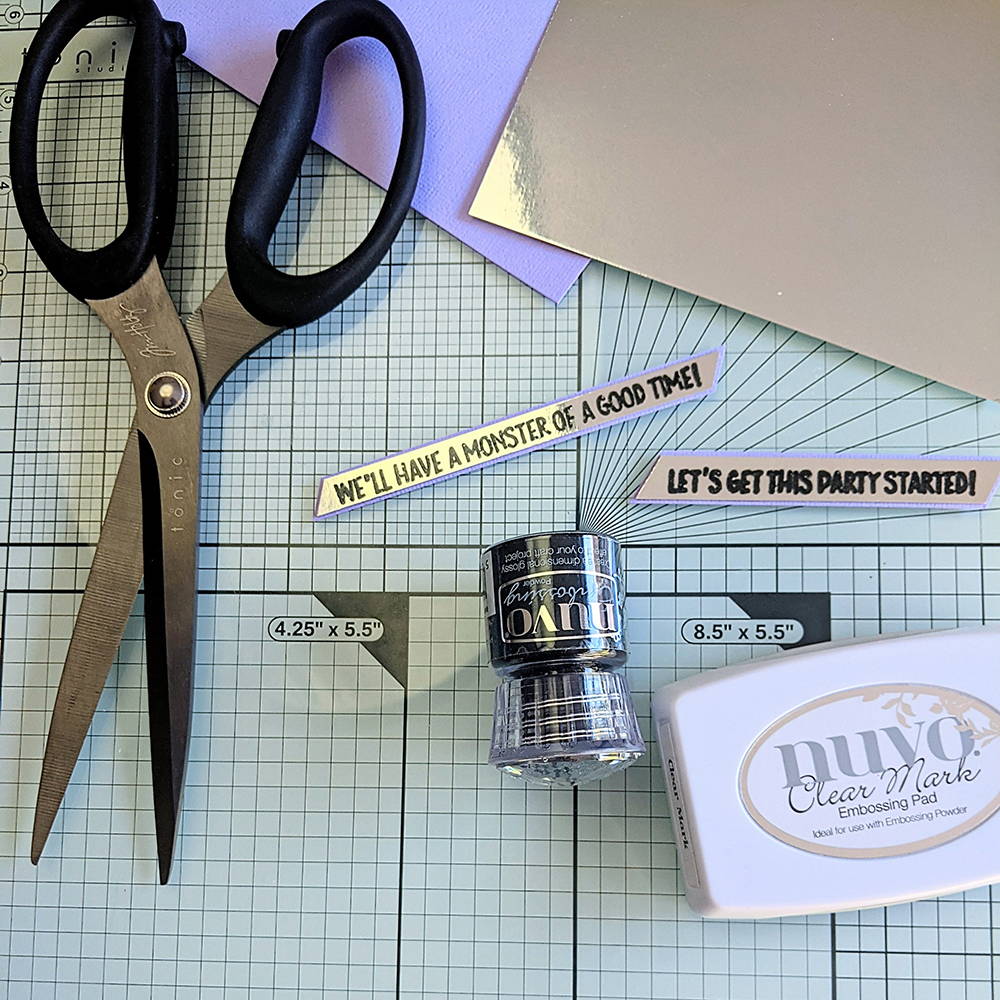
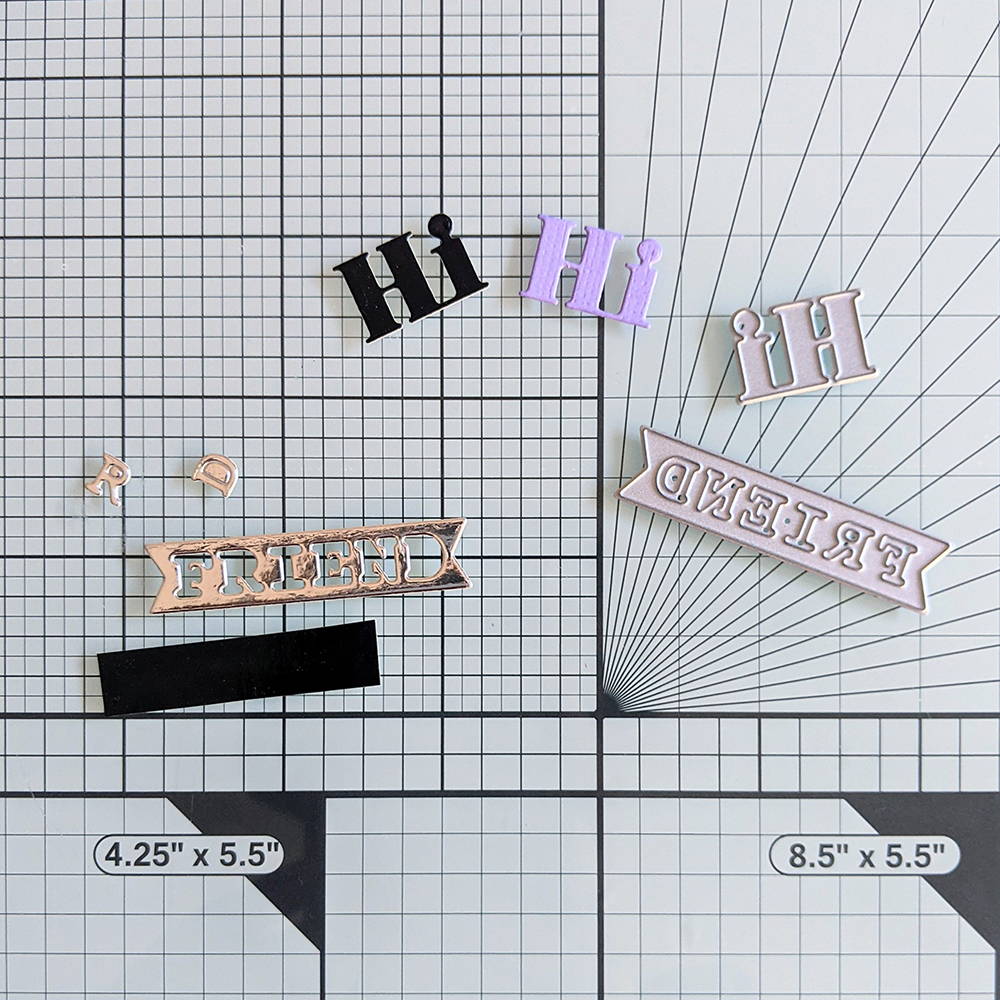
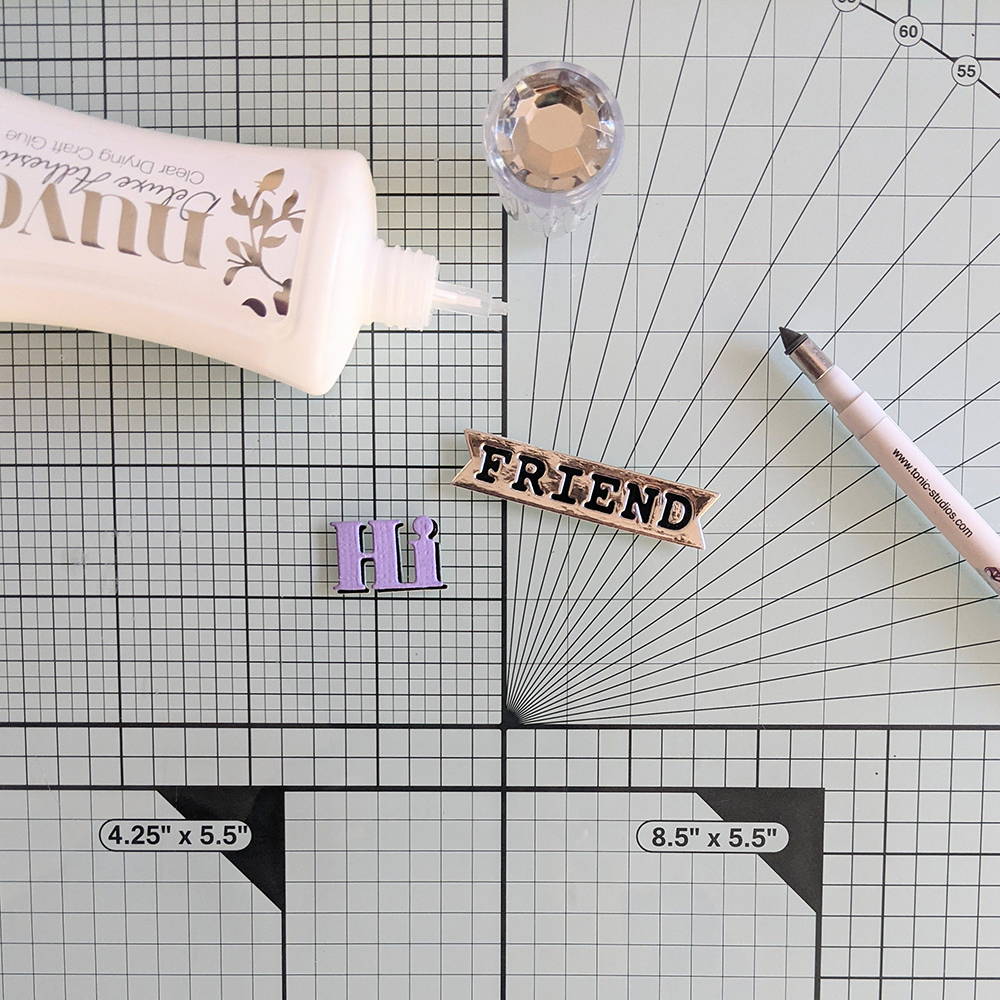
Now for the sentiments:
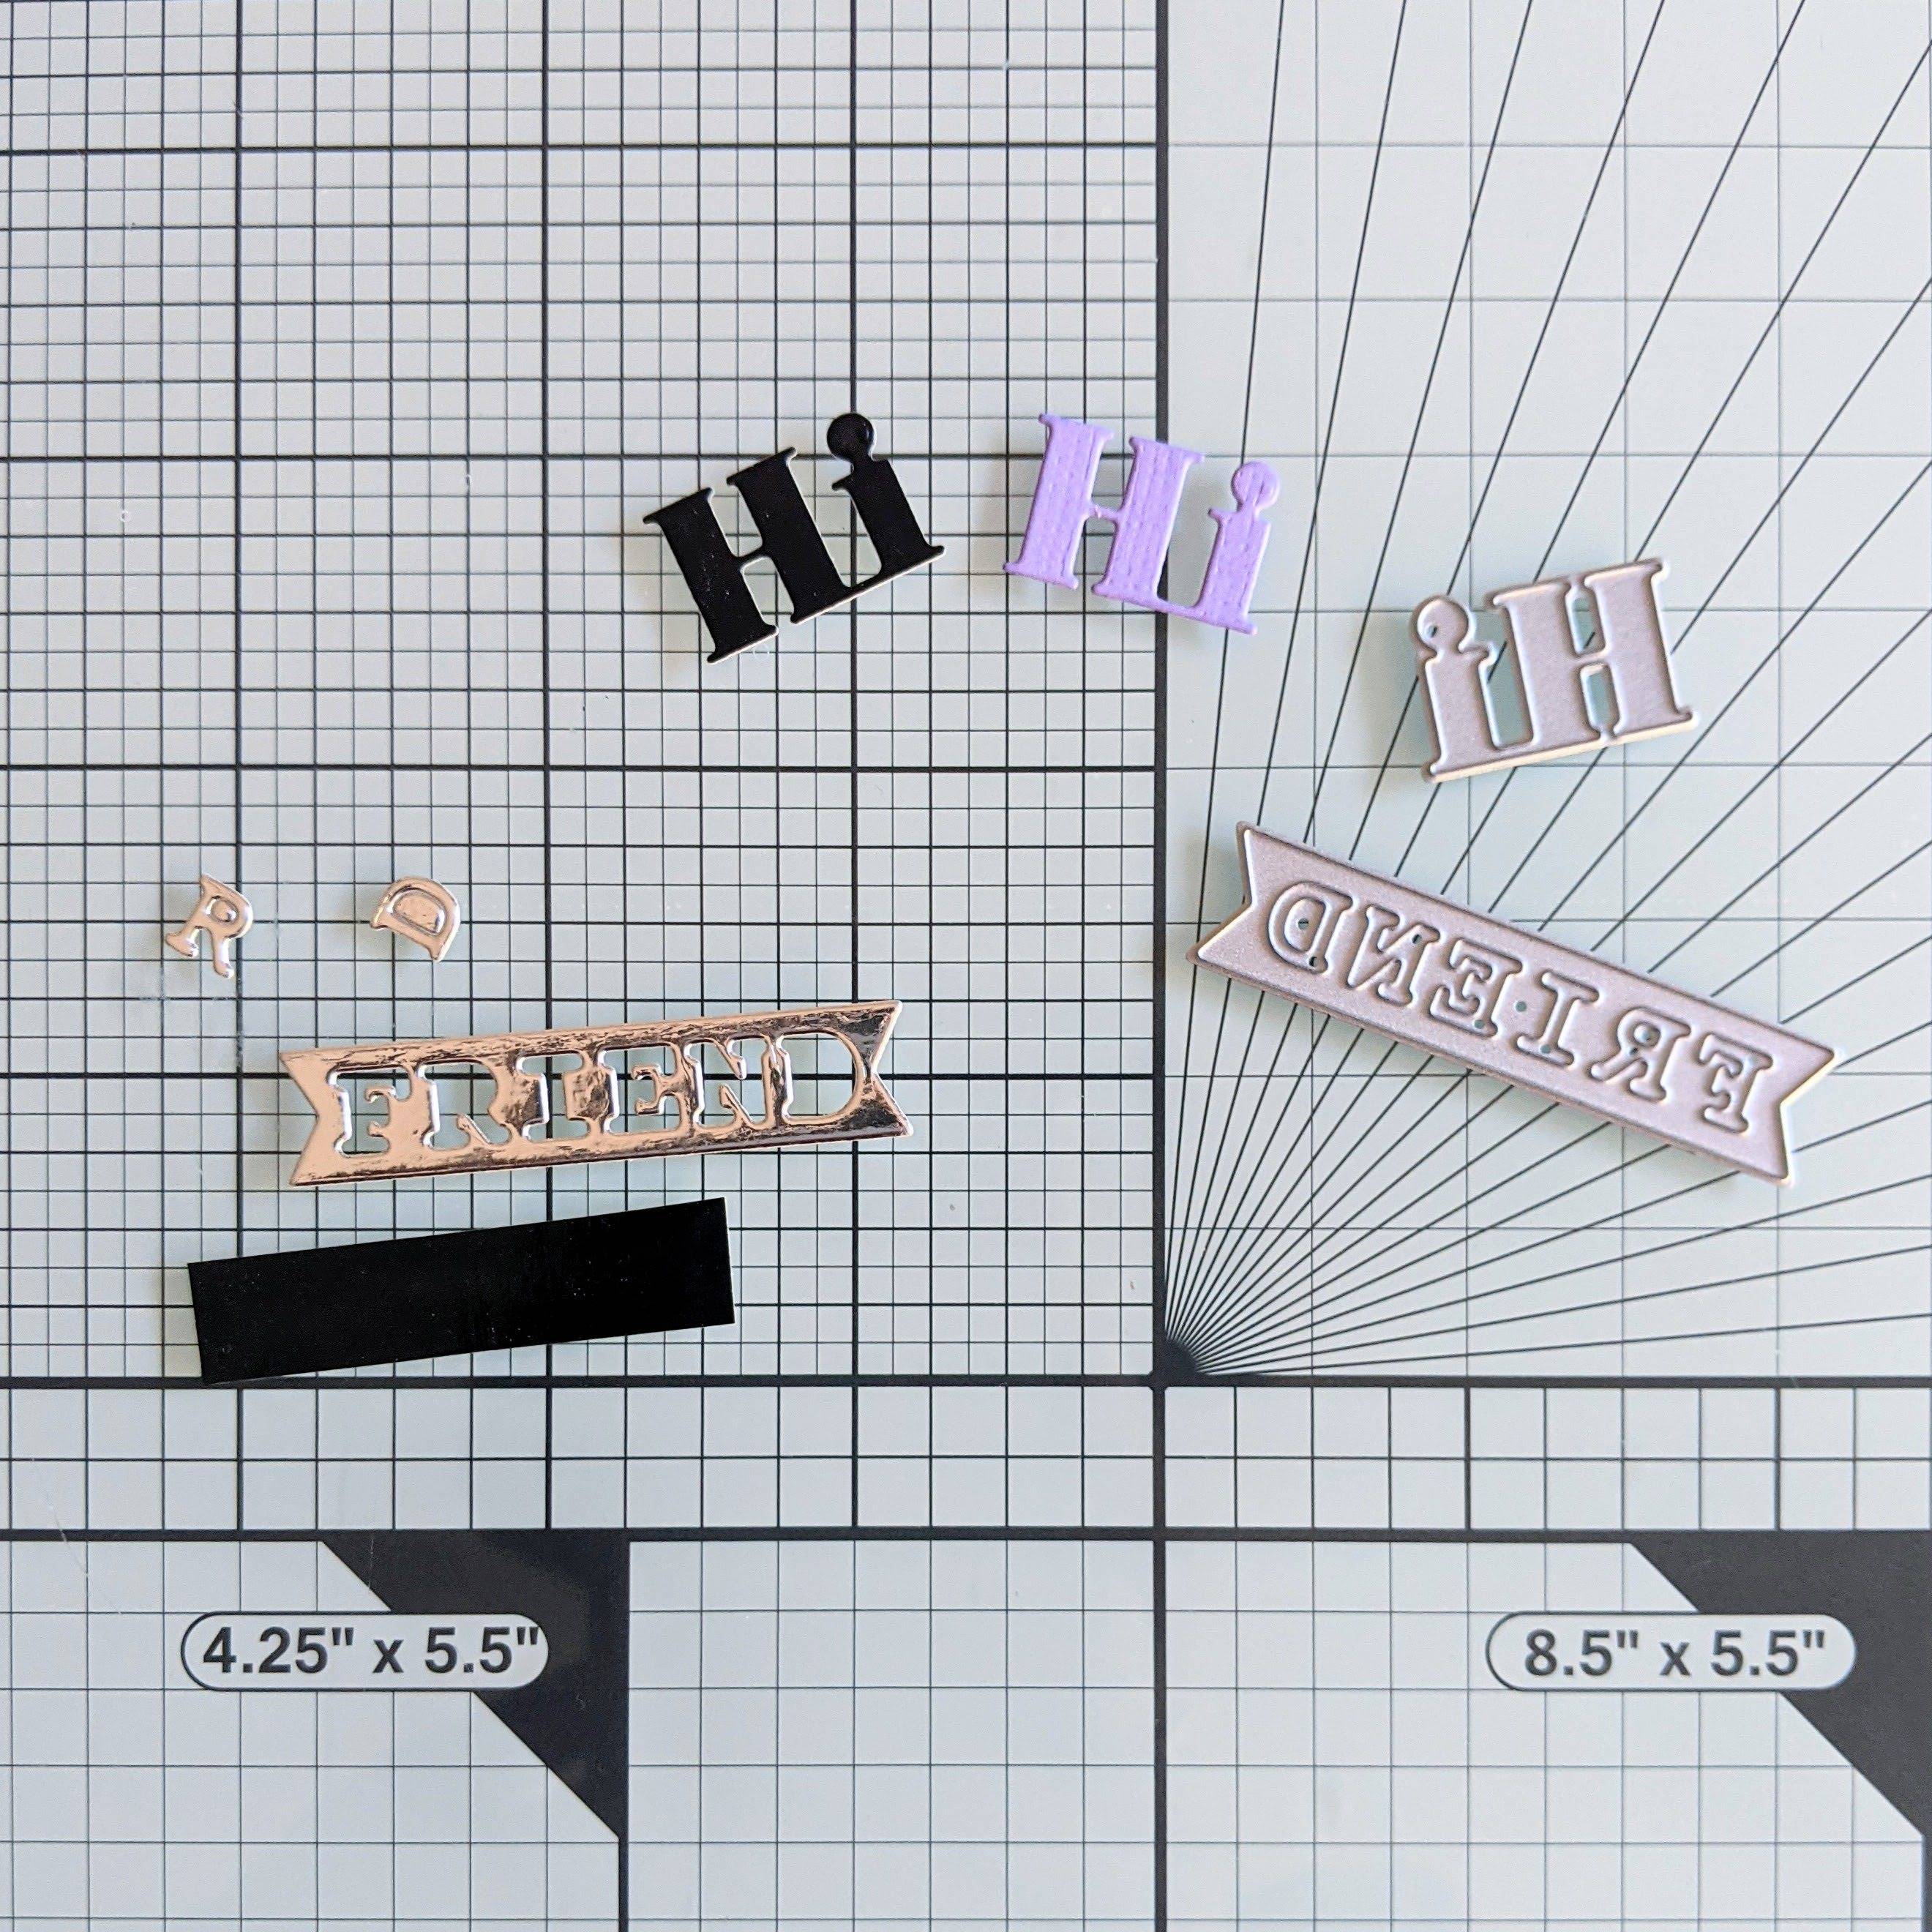
Using Nuvo Clear Mark Ink, stamp out the sentiments onto silver foiled cardstock and heat emboss with black embossing powder. Then trim into thin banners.
Attach the sentiments to the purple cardstock and trim to create a thin border of no more than 2mm thickness.
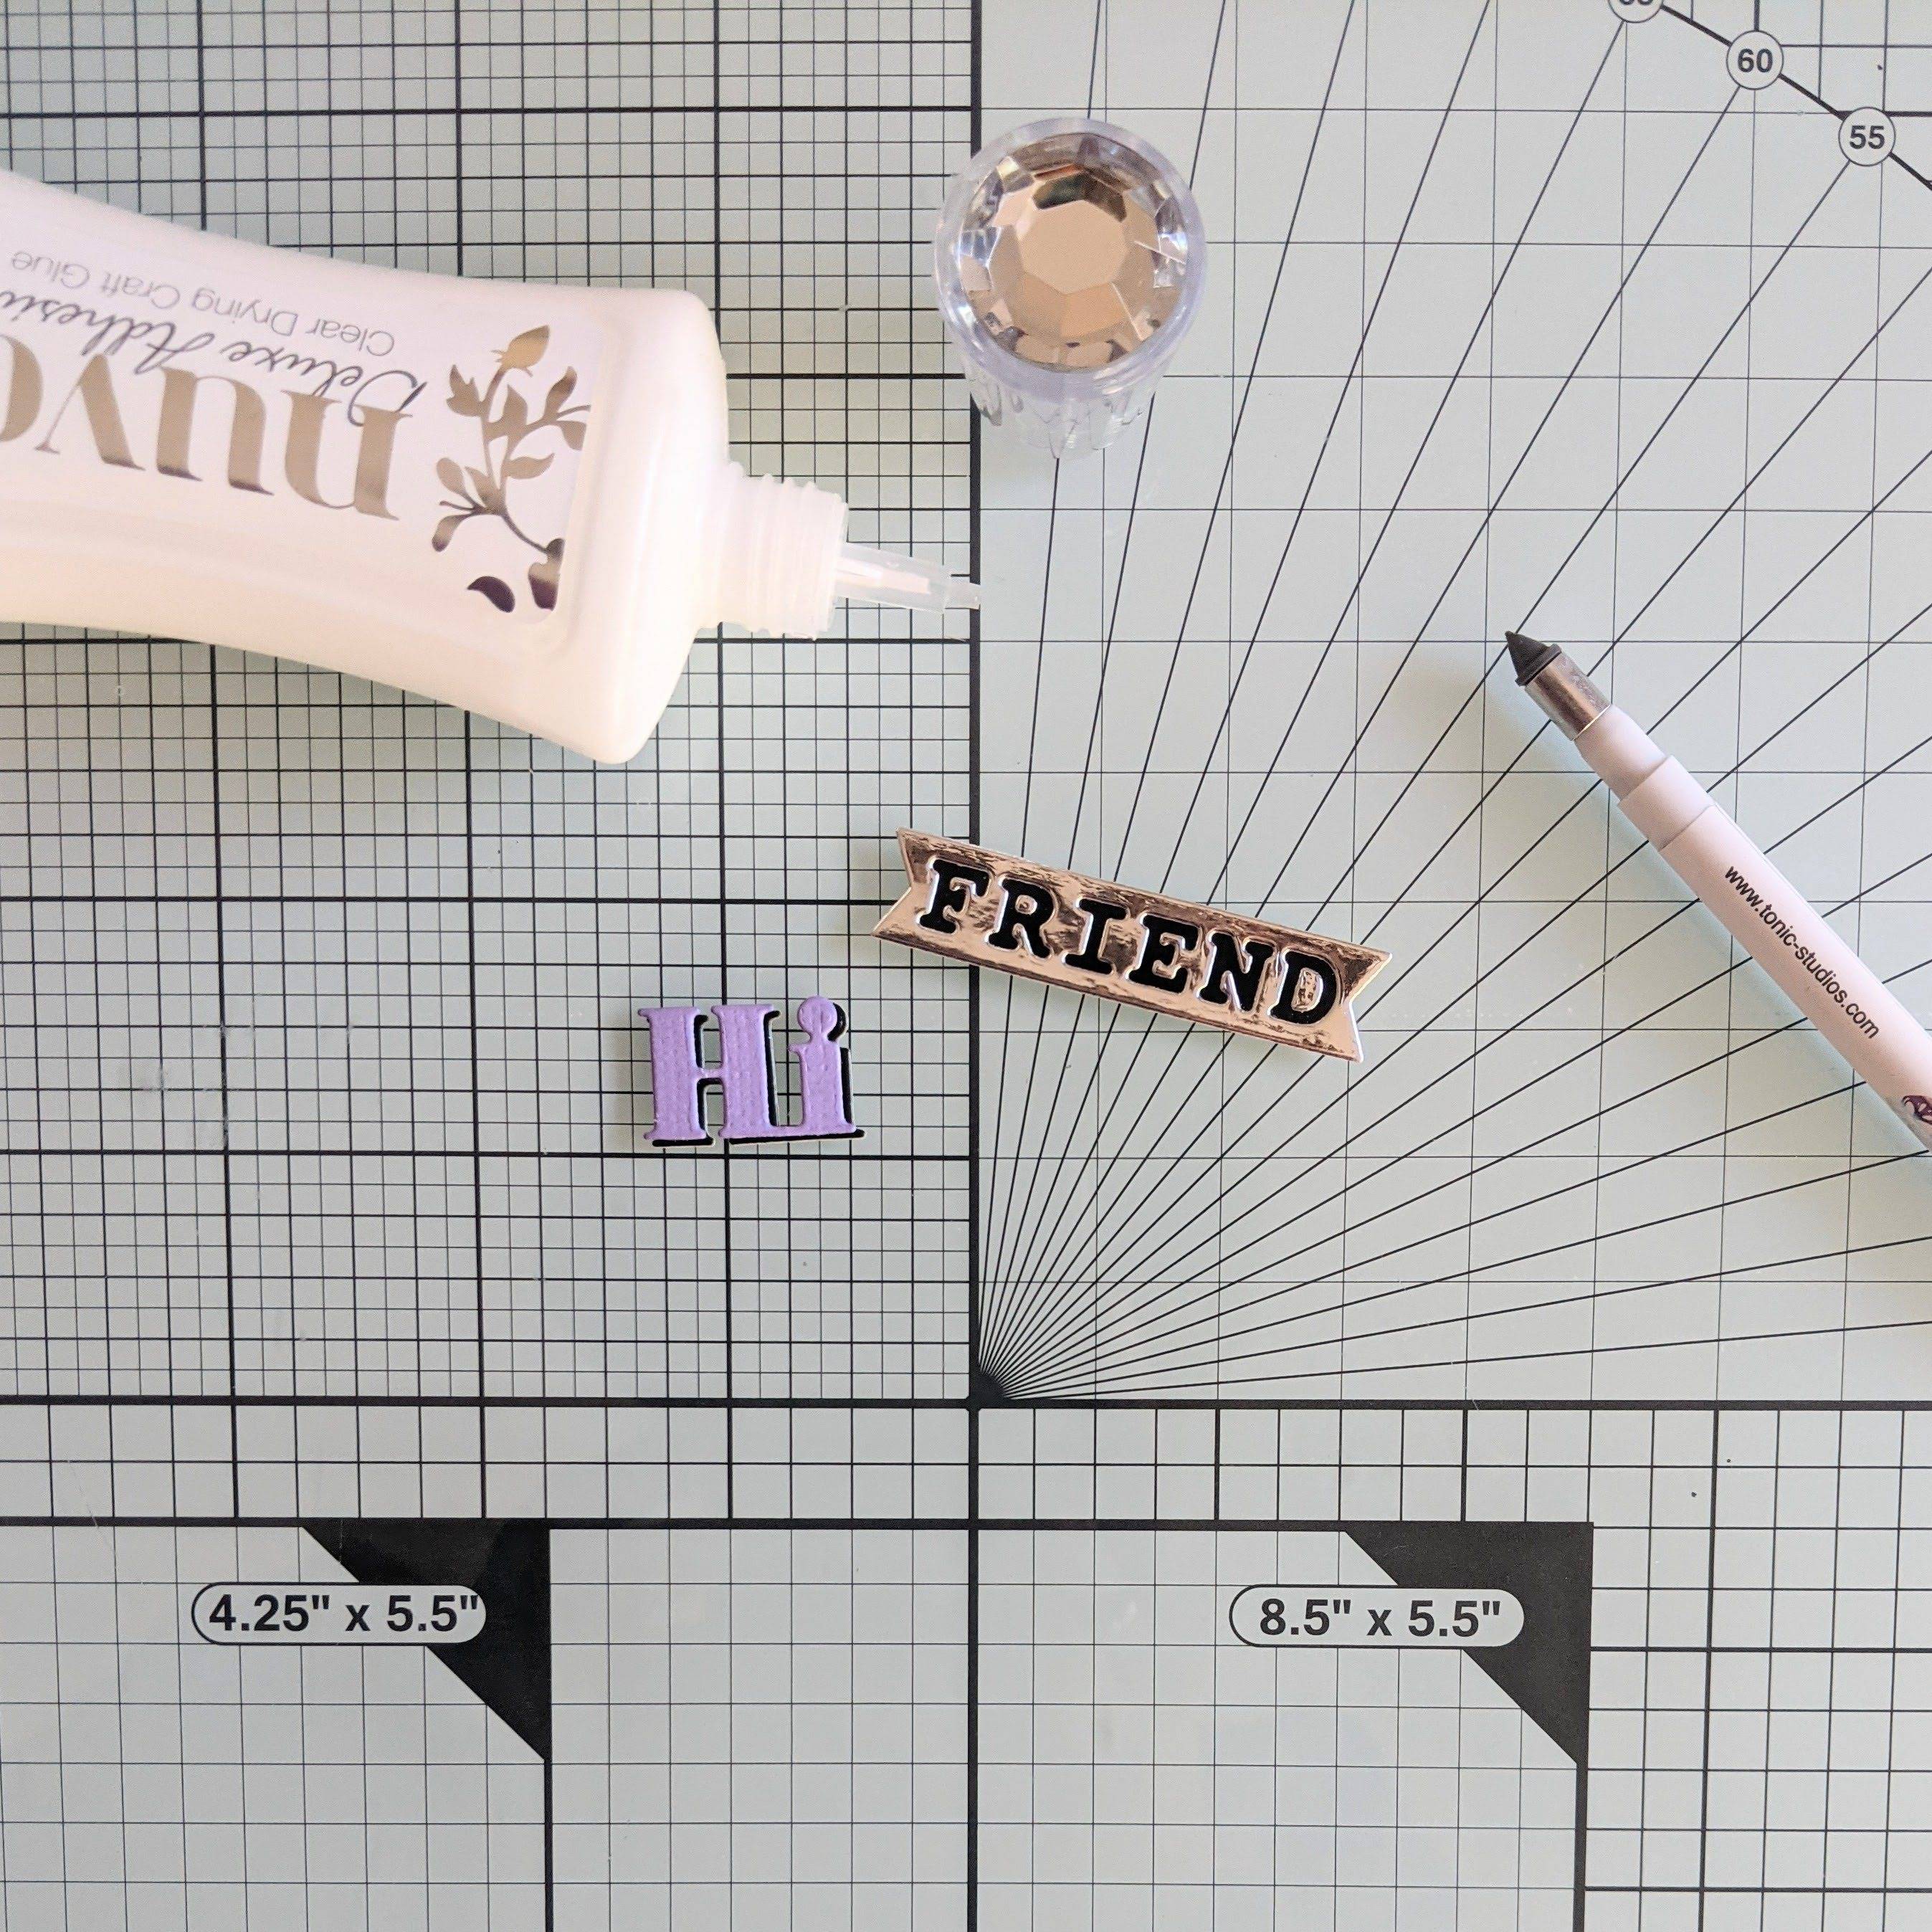
In silver foiled cardstock, die cut the ‘Friend’ banner and attach a strip of black glossy cardstock to the back to show through the ‘FRIEND’ letters. Attach the silver foiled centres to the letters ‘R’ and ‘D’.
In both the purple and glossy black cardstocks, die cut the ‘Hi’ sentiment and adhere on top of one another to create a ‘drop shadow’.

Now for the sentiments:
Using Nuvo Clear Mark Ink, stamp out the sentiments onto silver foiled cardstock and heat emboss with black embossing powder. Then trim into thin banners.
Attach the sentiments to the purple cardstock and trim to create a thin border of no more than 2mm thickness.
In silver foiled cardstock, die cut the ‘Friend’ banner and attach a strip of black glossy cardstock to the back to show through the ‘FRIEND’ letters. Attach the silver foiled centres to the letters ‘R’ and ‘D’.
In both the purple and glossy black cardstocks, die cut the ‘Hi’ sentiment and adhere on top of one another to create a ‘drop shadow’.
Step 14
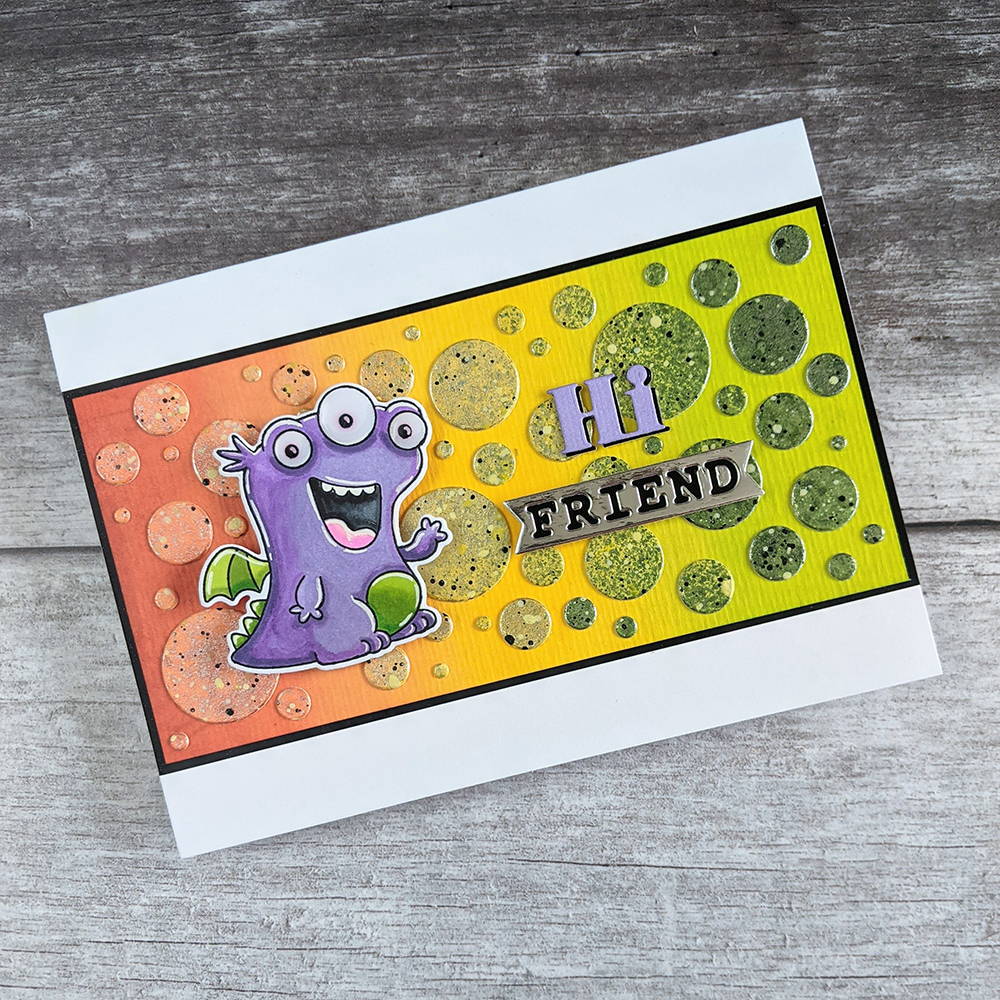
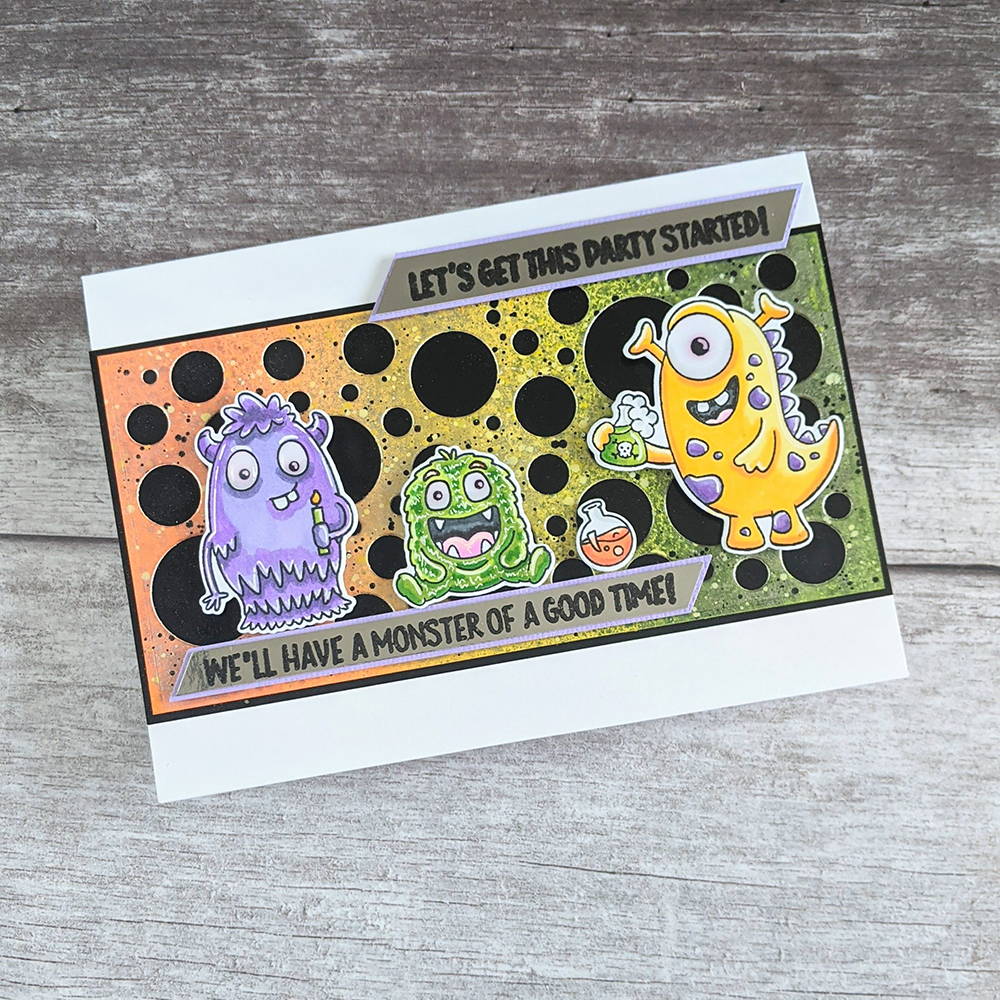
Using thin foam tape, attach the monsters and sentiments to the card fronts and there you have it...your monstrous pair of fun cards are finished!
I hope you have as much fun with this stamp set as I have...and hopefully not got TOO messy in the process! ‘Ink-tober’ sounds like my kind of month!...I hope you also get to enjoy playing around with some Nuvo to see what vibrant combinations you can come up with.
Thank you so much for reading my blog.
Happy crafting!
Kate x